

Protecting digital assets and information on the internet against loss, theft, unauthorized access, disruption, or damage is known as online security. A strong password is a surefire way to protect your data and information from hackers. This article will show you how to do this automatically and securely.

Spot abnormal user behaviors and iron out the bugs early with OpenReplay. Dive into session replays and reinforce your front-end against vulnerabilities that hackers search for.
Discover how at OpenReplay.com.
In this digital age, when cyberattacks are becoming more frequent and complex, strong passwords are necessary to safeguard our private data and stop illegal access.
You must set up a password to use any service, application, tool, account, or banking system. Creating a short and easy password makes you susceptible to breaches. This is why this article aims to help you create a password generator that generates strong passwords that will safeguard your personal information.
How can a password generator with customizable rules help create secure passwords?
The password generator offers a practical solution to the problem of creating a strong and secure password. This tool provides options such as length and character types, uppercase, lowercase, numbers, and special characters. This enables you to adhere to password complexity requirements set by different services.
Building the password generator tool
Our focus will be to use HTML, CSS, and JavaScript, to build the password generator as shown below:
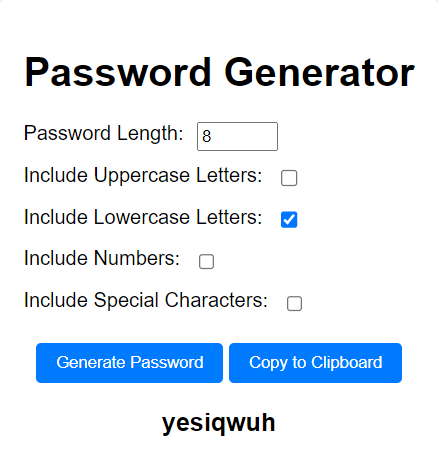
Features of the password generator are:
- Input field for password length.
- Checkboxes for selecting character types like uppercase, lowercase, numbers, and special characters.
- Generation of dynamic random passwords that meet the specified criteria when the button is clicked.
- Copy the password from the generator and use it wherever.
We will be using Visual Studio Code(VS Code) as the tool for development.
Setting up the project
We start by creating an empty folder called Password Generator and then three files inside this folder: index.html, style.css, and scripts.js.
Structuring Our HTML
Add the HTML code below to the ‘index.html` file.
<html lang="en">
  <head>
    <meta charset="UTF-8" />
    <meta name="viewport" content="width=device-width, initial-scale=1.0" />
    <title>Password Generator</title>
    <link rel="stylesheet" href="style.css" />
  </head>
  <body>
    <div class="container">
      <h1>Password Generator</h1>
      <div class="form-group">
        <label for="password-length">Password Length:</label>
        <input type="number" id="password-length" min="4" max="20" value="8" />
      </div>
      <div class="form-group">
        <label for="uppercase">Include Uppercase Letters:</label>
        <input type="checkbox" id="uppercase" />
      </div>
      <div class="form-group">
        <label for="lowercase">Include Lowercase Letters:</label>
        <input type="checkbox" id="lowercase" checked />
      </div>
      <div class="form-group">
        <label for="numbers">Include Numbers:</label>
        <input type="checkbox" id="numbers" />
      </div>
      <div class="form-group">
        <label for="special-characters">Include Special Characters:</label>
        <input type="checkbox" id="special-characters" />
      </div>
      <button id="generate-btn">Generate Password</button>
      <button id="copy-btn">Copy to Clipboard</button>
      <div id="password"></div>
    </div>
    <script src="scripts.js"></script>
  </body>
</html>;
We created our HTML page layout and linked both our style.css and scripts.js.
Before we add our styling, let’s do a deep dive into what each HTML tag stands for and how they work.
The HTML code begins with the main container element, defining the structure of the password generator interface.
<div class="container">

</div>
The HTML code shows the input fields for specifying the password length, uppercase, lowercase, numbers, and special characters.
<div class="container">
  <div class="form-group">
    <label for="password-length">Password Length:</label>
    <input type="number" id="password-length" min="4" max="20" value="8" />
  </div>
  <div class="form-group">
    <label for="uppercase">Include Uppercase Letters:</label>
    <input type="checkbox" id="uppercase" />
  </div>
  <div class="form-group">
    <label for="lowercase">Include Lowercase Letters:</label>
    <input type="checkbox" id="lowercase" checked />
  </div>
  <div class="form-group">
    <label for="numbers">Include Numbers:</label>
    <input type="checkbox" id="numbers" />
  </div>
  <div class="form-group">
    <label for="special-characters">Include Special Characters:</label>
    <input type="checkbox" id="special-characters" />
  </div>
</div>
In the code below, the button element with the id of generate-btn, when clicked, triggers the password generation process. In contrast, the button element with the id of copy-btn copies the generated password to the clipboard.
<button id="generate-btn">Generate Password</button>
<button id="copy-btn">Copy to Clipboard</button>
Finally, a div element with an id of “password” displays the generated password.
<div id="password"></div>Styling the Password Generator with our CSS
Update the style.css file with the code below:
body {
  font-family: Arial, sans-serif;
  margin: 0;
  padding: 0;
  display: flex;
  justify-content: center;
  align-items: center;
  height: 100vh;
  background-color: #f3f3f3;
}
.container {
  text-align: center;
  background-color: #fff;
  padding: 20px;
  border-radius: 8px;
  box-shadow: 0 2px 4px rgba(0, 0, 0, 0.1);
}
.form-group {
  margin-bottom: 10px;
  display: flex;
  gap: 0.7rem;
}
label {
  display: block;
  margin-bottom: 5px;
}
input[type="checkbox"] {
  margin-right: 5px;
}
button {
  margin-top: 10px;
  padding: 8px 16px;
  background-color: #007bff;
  color: #fff;
  border: none;
  border-radius: 4px;
  cursor: pointer;
}
button:hover {
  background-color: #0056b3;
}
#password {
  margin-top: 20px;
  font-size: 20px;
  font-weight: bold;
}
The CSS stylesheet above styles various elements of the password generator interface, including layout, form elements, buttons, and password display area.
Writing the JavaScript code:
Update the scripts.js file to include the JavaScript code below.
const passwordLengthInput = document.getElementById("password-length");
const uppercaseCheckbox = document.getElementById("uppercase");
const lowercaseCheckbox = document.getElementById("lowercase");
const numbersCheckbox = document.getElementById("numbers");
const specialCharactersCheckbox = document.getElementById("special-characters");
const generateButton = document.getElementById("generate-btn");
const copyButton = document.getElementById("copy-btn");
const passwordDisplay = document.getElementById("password");

const generatePassword = () => {
  const length = parseInt(passwordLengthInput.value);
  const uppercase = uppercaseCheckbox.checked;
  const lowercase = lowercaseCheckbox.checked;
  const numbers = numbersCheckbox.checked;
  const specialCharacters = specialCharactersCheckbox.checked;
  const characterPool = [];
  if (uppercase) characterPool.push(..."ABCDEFGHIJKLMNOPQRSTUVWXYZ");
  if (lowercase) characterPool.push(..."abcdefghijklmnopqrstuvwxyz");
  if (numbers) characterPool.push(..."0123456789");
  if (specialCharacters) characterPool.push(..."!@#$%^&*()_+{}[]|:;<>,.?/~");
  let password = "";
  for (let i = 0; i < length; i++) {
    const randomIndex = Math.floor(Math.random() * characterPool.length);
    password += characterPool[randomIndex];
  }
  return password;
};

const passwordLengthInput = document.getElementById("password-length");
generateButton.addEventListener("click", () => {
  const newPassword = generatePassword();
  passwordDisplay.textContent = newPassword;
});
copyButton.addEventListener("click", async () => {
  try {
    await navigator.clipboard.writeText(passwordDisplay.textContent);
    copyButton.textContent = "Password Copied";
  } catch (error) {
    alert("Error copying to clipboard: " + error);
  }
});
Declare the variables:
First, we declared variables to store references to various elements in the HTML document as shown in the code below.
const passwordLengthInput = document.getElementById("password-length");
const uppercaseCheckbox = document.getElementById("uppercase");
const lowercaseCheckbox = document.getElementById("lowercase");
const numbersCheckbox = document.getElementById("numbers");
const specialCharactersCheckbox = document.getElementById("special-characters");
const generateButton = document.getElementById("generate-btn");
const copyButton = document.getElementById("copy-btn");
const passwordDisplay = document.getElementById("password");
Next, we define a function named generatePassword to generate a random password based on user input and selections.
const generatePassword = () => {The code below retrieves user input for password length and the status of checkboxes indicating whether to include uppercase letters, lowercase letters, numbers, and special characters.
const length = parseInt(passwordLengthInput.value);
const uppercase = uppercaseCheckbox.checked;
const lowercase = lowercaseCheckbox.checked;
const numbers = numbersCheckbox.checked;
const specialCharacters = specialCharactersCheckbox.checked;
An array named characterPool is initialized to hold the characters from which the password will be generated. Characters are added to this array based on the user’s selections.
const characterPool = [];
if (uppercase) characterPool.push(...'ABCDEFGHIJKLMNOPQRSTUVWXYZ');
if (lowercase) characterPool.push(...'abcdefghijklmnopqrstuvwxyz');
if (numbers) characterPool.push(...'0123456789');
if (specialCharacters) characterPool.push(...'!@#$%^&*()_+{}[]|:;<>,.?/~');
The If statement checks whether specific options for including character types are selected, and if they are, the characters belonging to the category are appended to the character pool array.
To maintain the length of the characters based on the number of characters allowed, we need to create a loop that runs for the length number of times. Each iteration, a random character is selected from the character pool array and appended to the password string, which continues until the length is achieved.
let password = "";
for (let i = 0; i < length; i++) {
  const randomIndex = Math.floor(Math.random() * characterPool.length);
  password += characterPool[randomIndex];
}
Finally, the generatePassword function returns the generated password as a string.
return password;
};
Update and display the generated password
An event listener is added to the generateButton to trigger the password generation process when clicked. The generated password is then displayed.
generateButton.addEventListener("click", () => {
  const newPassword = generatePassword();
  if (newPassword.length === 0) {
    passwordDisplay.textContent = "Please select at least one character type.";
  } else {
    passwordDisplay.textContent = newPassword;
  }
});
copyButton.addEventListener("click", async () => {
  try {
    await navigator.clipboard.writeText(passwordDisplay.textContent);
    copyButton.textContent = "Password Copied";
  } catch (error) {
    alert("Error copying to clipboard: " + error);
  }
});- If the length of the generated password is zero, no character types were selected for password generation. An error message will be displayed to the user, instructing them to select at least one character type
- When the
copyButtonis clicked, an event listener is executed. await navigator.clipboard.writeText(passwordDisplay.textContent): This line uses the Clipboard API’swriteText()method to asynchronously write the text content of thepasswordDisplayelement to the clipboard.copyButton.textContent = "Password Copied": After the text is successfully copied to the clipboard, the text content of the copyButton element is updated to “Password Copied” to indicate that the copying process was successful.catch (error) { console.error("Error copying to clipboard:", error); }: If an error occurs during the copying process, it will be caught by the catch block, and an error message will be alerted
Conclusion
In this article, we learned how to develop a password generator with HTML, CSS, and JavaScript. We covered the essential features for creating a functioning interface for generating random passwords using adjustable parameters.
We used DOM modification, event handling, conditional statements, and randomization techniques to create a strong solution that lets users select different character kinds and password lengths. Users can copy the generated password and use it anywhere, which enhances usability.
Detect, Fix, and Fortify
Spot abnormal user behaviors and iron out the bugs early with OpenReplay. Dive into session replays and reinforce your front-end against vulnerabilities that hackers search for.
Explore DevTools