Build an app with React and Supabase

This tutorial will explore building a basic CRUD (Address Book) application using React and Supabase, setting up a Supabase database, connecting a React application to it, and implementing CRUD operations in our application. By the end of this tutorial, you will have a solid understanding of how to use Supabase with React and how to implement basic CRUD operations in your web application.
React has been a popular choice for building web applications in the recent past. And technologies like Supabase (an open source alternative to Firebase) have eased the web development process by providing many features like authentication, databases, etc., that a typical backend would provide for the frontend applications. This eliminates the need for having a dedicated backend written with Node.js or any other backend framework; you get a full-stack app without all the work! And, almost all web applications operate on the basic principle of CRUD. CRUD stands for Create, Read, Update, and Delete. It refers to the four basic operations that can be performed on data stored in a database. These operations are fundamental to most database-driven applications and are essential for managing data.
You will need:
- Node JS (LTS Version)
- npm 7 or greater
- VS Code or any Code editor of your choice.
- Basic understanding of Supabase auth as we will build this project on top of an auth layer. Check the article here and come back.
- Basic knowledge of Bootstrap
- Starter code (Import from GitHub by running the command below)
git clone --branch start --single-branch git@github.com:nirmal1064/react-supabase-crud.gitSupabase Database Overview and Database Setup
For this CRUD project, let’s create a new project in Supabase and name it Address Book or whatever name you like. Supabase provides a Postgres relational database that comes with every project and is included in their free plan as well.
Supabase provides features like a Table view, SQL editor, Relationships manager, etc. PostgreSQL’s Row Level Security (RLS) is the most important feature, which helps developers define fine-grained access controls for each database table. RLS policies enable developers to control which rows in a table users can access, update, or delete based on their role or other criteria.
Let’s create a database for our project. Open the Supabase project, and click’ Table Editor’ on the left navigation menu. Then click on the Create a new Table button.
You will get a screen like the one below,
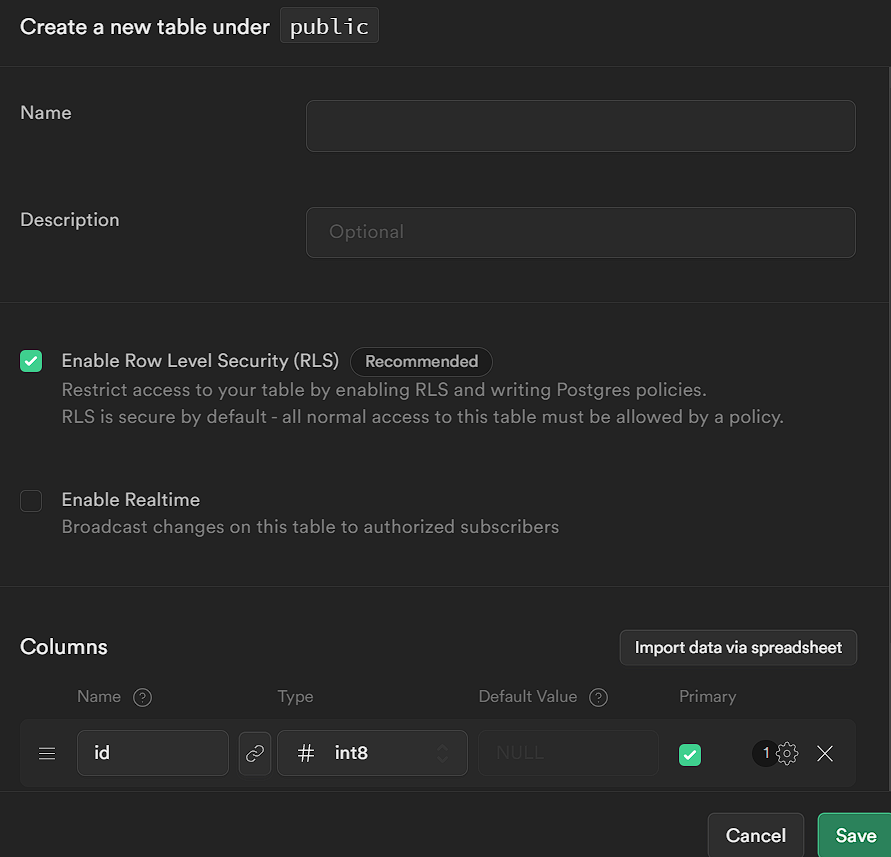
Enter the Name and ensure Enable Row Level Security (RLS) is checked.
Under the columns, there will be id and created_at columns by default. Let’s add four more columns, as shown in the image below,
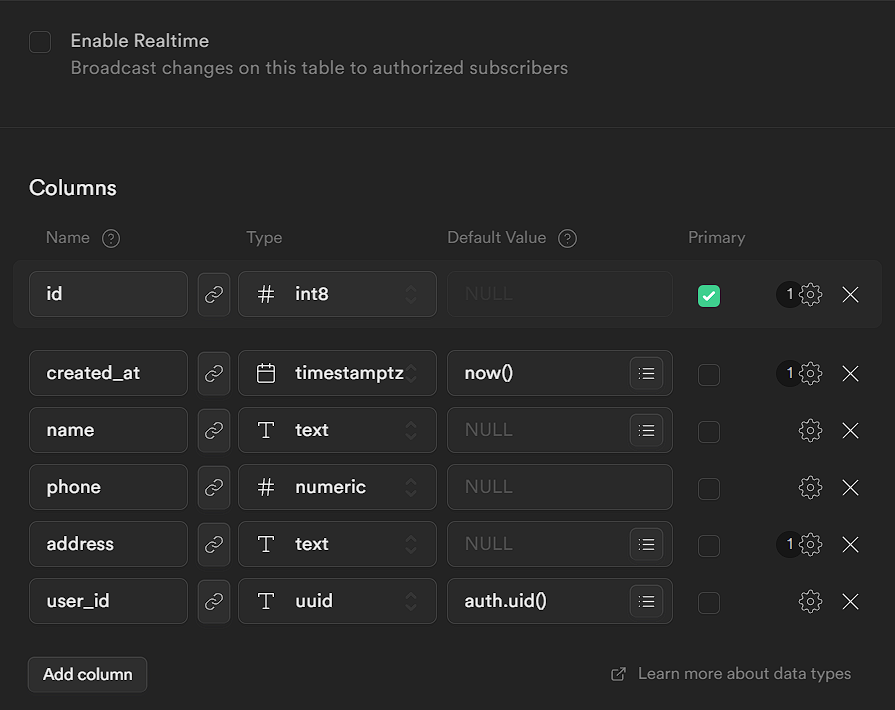
We have made name and phone non-null fields. To do so, click the settings icons on the right and uncheck Is Nullable. (Refer to the image below).
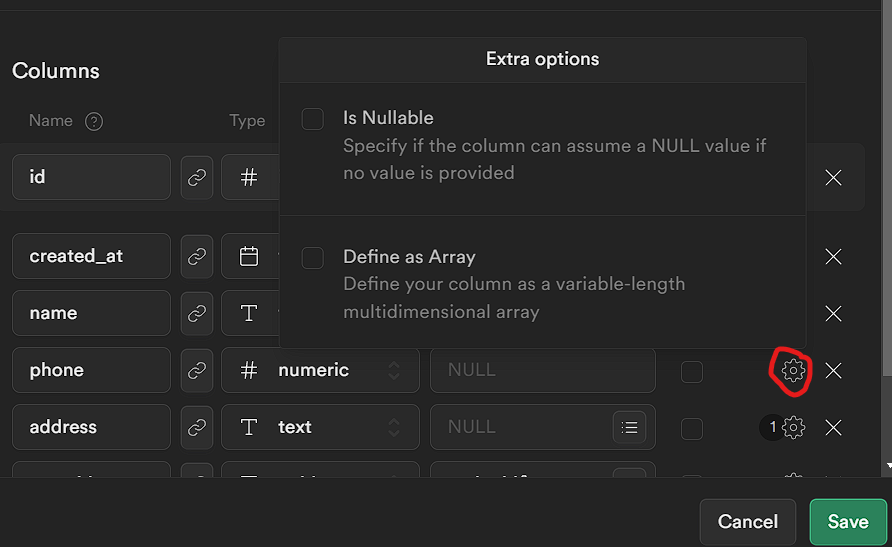
The address field is a text field. The user_id field corresponds to the user who created this contact. So we gave the default value as auth.uid(). So whenever a contact is created, the user id field is populated by default by Supabase.
Once all is done, Save it.
Connecting React App to the Supabase Database
We have all the necessary code to connect to Supabase in the starter code. So, connecting to the database is pretty simple. The syntax is as follows.
const { data, error } = await supabase.from("database_name");The data contains the valid response data, and error contains the error response, if any.
We can easily chain methods to the above code and perform various operations. For example,
// For Select Operations
const { data, error } = await supabase.from("database_name").select();

// For Insert Operations
const { data, error } = await supabase.from("database_name").insert(data);

// For Update Operations
const { data, error } = await supabase
 .from("database_name")
 .update(data)
 .eq(condition);

// For Delete Operations
const { data, error } = await supabase
 .from("database_name")
 .delete()
 .eq(condition);
We will see each of these operations in detail in the upcoming sections.
At this point, you are presumed to have the starter code and understand Supabase user authentication. Also, you have created a user for this app by following the steps mentioned in the previous article. If not done, kindly revisit the article here and come back.
Implementation of CRUD operations
In the upcoming sections, we will implement each of the CRUD operations with the help of RLS.
Why RLS is needed here? RLS is needed because in our database we store users’ contact informationsers. We want to restrict access to these data so that only the users who created those contacts can see it.
So, Now let’s start the coding part.
Let’s create a separate context to maintain the contacts state. Create ContactProvider.jsx inside the context folder.
import { createContext, useContext, useEffect, useState } from "react";

const ContactContext = createContext({});

export const useContacts = () => useContext(ContactContext);

const ContactProvider = ({ children }) => {
 const [contacts, setContacts] = useState([]);
 const [errorMsg, setErrorMsg] = useState("");
 const [msg, setMsg] = useState("");

 return (
   <ContactContext.Provider
     value={{
       contacts,
       msg,
       setMsg,
       errorMsg,
       setErrorMsg
     }}>
     {children}
   </ContactContext.Provider>
 );
};

export default ContactProvider;
Here, we are setting up a Context Provider for contacts. We have three state variables:contacts for storing the contact details. msg and errorMsg for storing the success and error messages. Then we export these state variable and their setter methods that can be used in the components later.
To make the article concise, we will explain only the Supabase functionalities in detail, whereas the UI and styling part won’t be explained in detail. It’s up to the reader to style the components as they like.
Implementing Create Operation
The Create operation in React is an equivalent of a database insert operation. First, we must set up RLS for the insert operation, using the Supabase API.
Open the project in Supabase. Then go to Authentication in the side navigation bar. Click on Policies and then click on New Policy. In the screen that pops up, click on For Full Customization. In the next screen, enter the values as described in the image below.
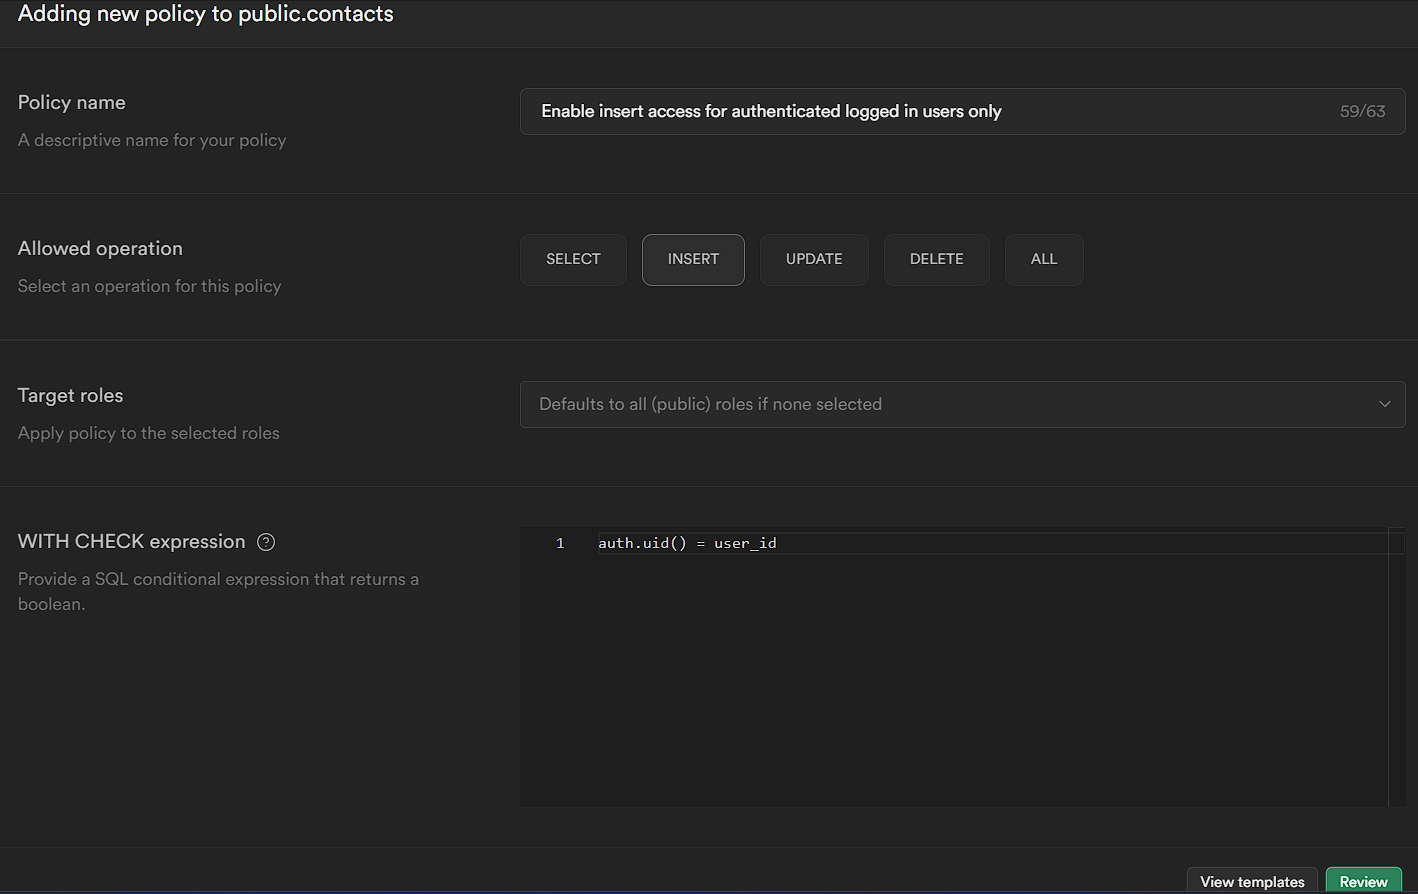
As the Policy name field indicates, we will only allow insert access for authenticated users. You can describe the policy in whatever way you find suitable. This field doesn’t need to be the same as that.
Then we selected the Allowed operation to Insert. Leave the Target roles blank.
In the WITH CHECK expression field, we set the condition as auth.uid() = user_id, which means the user_id column in the table should match the authenticated user’s id, thereby restricting access only to the authenticated users.
Let’s add the insert functionality to our app. Open ContactProvider.jsx and add the following function inside it.
import { supabase } from "../supabase/client";

// Rest of the code
const ContactProvider = ({ children }) => {
 // Rest of the code
 const addContact = async (contact) => {
   const { error } = await supabase.from("contacts").insert(contact);
   if (error) {
     setErrorMsg(error.message);
   }
 };

 return (
   <ContactContext.Provider
     value={{
       contacts,
       msg,
       setMsg,
       errorMsg,
       setErrorMsg,
       addContact
     }}>
     {children}
   </ContactContext.Provider>
 );
};

export default ContactProvider;
We have created an async addContact method that takes in a contact object as a parameter and inserts the contact into the database. The insert operation will return an error object, if any. If there is any error, we will update the errorMsg. We can also add a select operation after the insert to return the data we just created. But we haven’t set up the rules for select operations. So let’s leave it for now and add it later.
We will use Bootstrap’s’ Modal’ component to implement the user interface (UI). First, create the ContactList.jsx inside the pages directory. Let’s add a route to this page as well.
You can copy the code for the UI from the GitHub commit here.
In the above code, in App.jsx, we are wrapping our contacts route inside the ContactProvider because we want our contacts to be available to this particular route only. And in ContactList.jsx, we display a header and a Button for Adding Contacts.
Until this point, the page would look like this,

We need to add a functionality where we display the modal to add a new contact when the Add Contact button is clicked. So let’s create the modal first. Create ContactModal.jsx inside the components directory and add the code as shown in the GitHub commit here.
The component takes in four props.
show- to show or hide the modal.handleClose- a function to close the modal when the user clicks on close or outside of the component.type- To indicate the type of operation, i.e., Add or Edit. We will use the same component for both adding and editing the contactcontact- The active contact object to be displayed when editing; otherwise an empty object in case of Add operation.
We use react-bootstrap’s <Modal/> component to render the Modal. We are using the useState and useRef hooks from React to manage the state of the form inputs and the useContacts hook from the ContactProvider context to manage the contacts data. We use the react-bootstrap’s <Modal/> and <Card> components to style and display the form. The handleSubmit function is called when the user submits the form. It handles the inputs’ validation and the contact data’s saving.
Also, let’s create a react-bootstrap’s Toast component to display our application’s success and error messages.
Create ToastMessage.jsx inside the components directory and add the code as shown in the commit here.
This component takes in four props.
showto indicate whether to show/hide the toast message.type, the type of the toast,successorerror.message, the message to display.handleClose, the function to execute when the toast is closed.
We are enclosing our Toast inside the ToastContainer where we position our toast to the top-end of the screen.
Then, in the Toast, we set the autohide prop, which will close the toast automatically after the delay milliseconds. The Toast has a Headerand Body where we define the heading and message, respectively.
Now, Let’s add both of the above modals to the ContactList page and make the functionality to display the ContactModal when the Add Contact button is clicked. The code for this change can be found in the GitHub commit here.
We have declared two ToastMessage components, one with the type Success and the other with the type Error. For the ContactModal, we have a few state variables showContactModal to indicate whether to show or hide the modal, type indicates Add or Edit type, and activeContact contains the current contact to edit or an empty contact in case of Add.
When the Add Contact button is clicked, the handleAdd function is triggered, where we set the type to Add and showContactModal to true. We also have a closeContactModal function, triggered when the modal is closed. In this function, we set the activeContact to an empty object, showContactModal to false, and type to an empty string. We are passing these state variables and functions as props to the ContactModal.jsx.
When the Add Contact is clicked, the modal will open. It will be like the below,
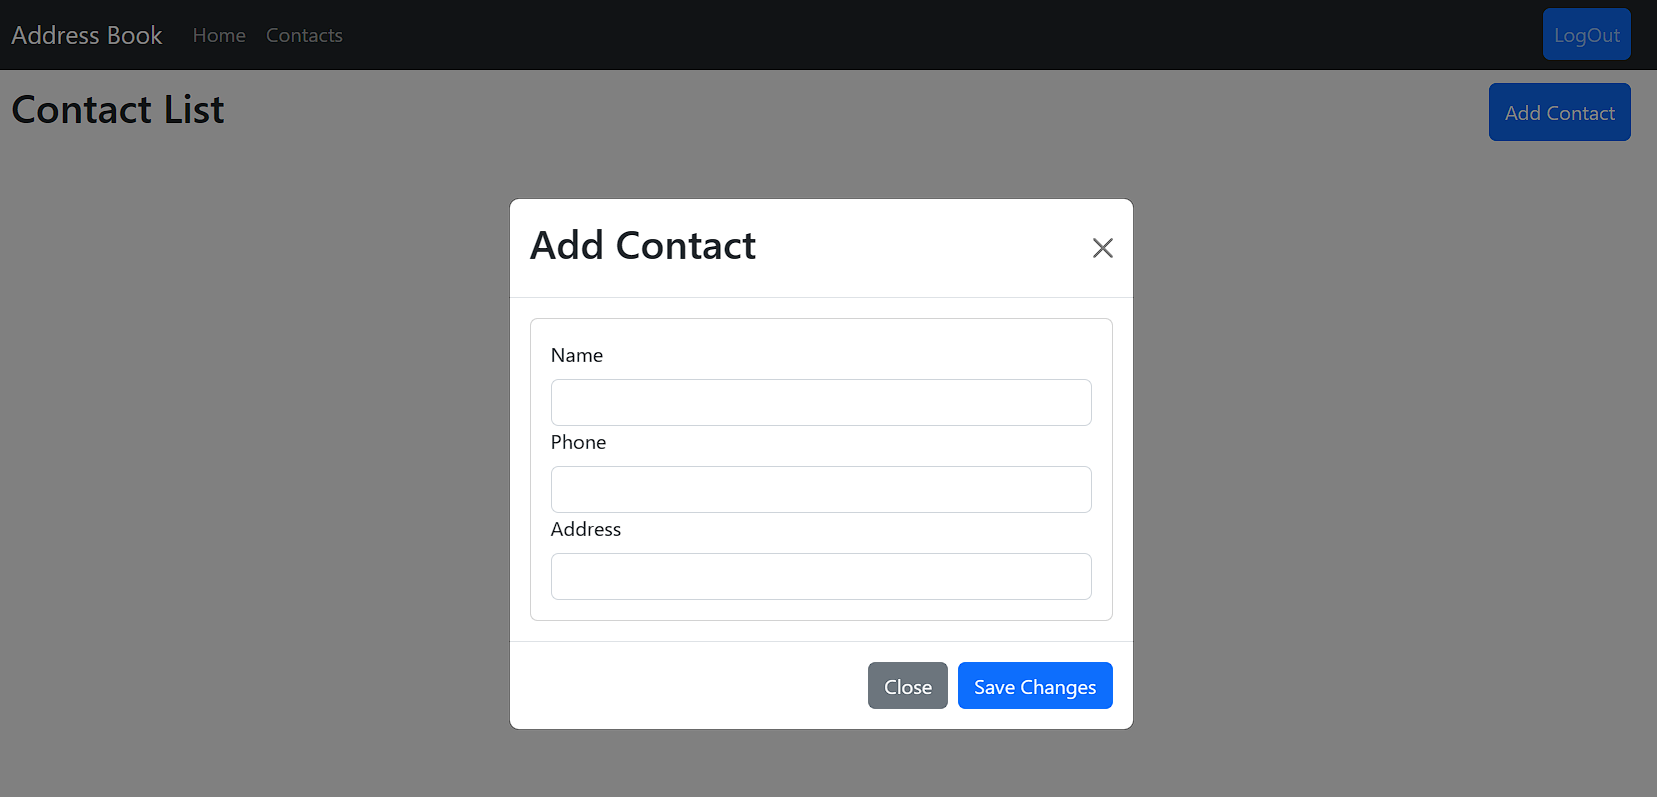
Fill out the form and click submit. A contact will be added. And the toast will be displayed as shown in the below image.
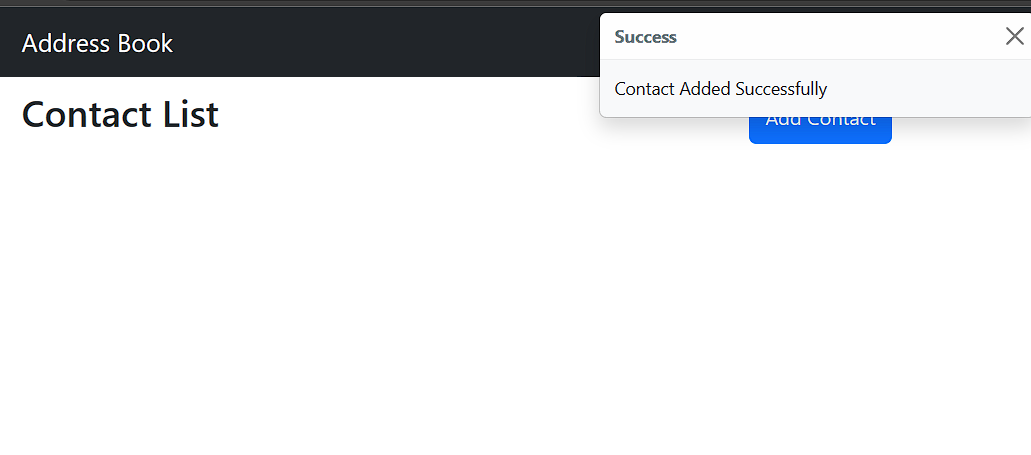
As we haven’t yet implemented the Read operation, you can verify the created contact by visiting the supabase project -> Table editor -> <Table Name>.
Session Replay for Developers
Uncover frustrations, understand bugs and fix slowdowns like never before with OpenReplay — an open-source session replay tool for developers. Self-host it in minutes, and have complete control over your customer data. Check our GitHub repo and join the thousands of developers in our community.
Implementing Read Operation
The Read operation in React is an equivalent of a database select operation. First, we must set up RLS for the select operation in Supabase.
Open the project in Supabase. Then go to Authentication in the side navigation bar. Click on Policies and then click on New Policy. In the screen that pops up, click on For Full Customization. In the next screen, enter the values as described in the image below.
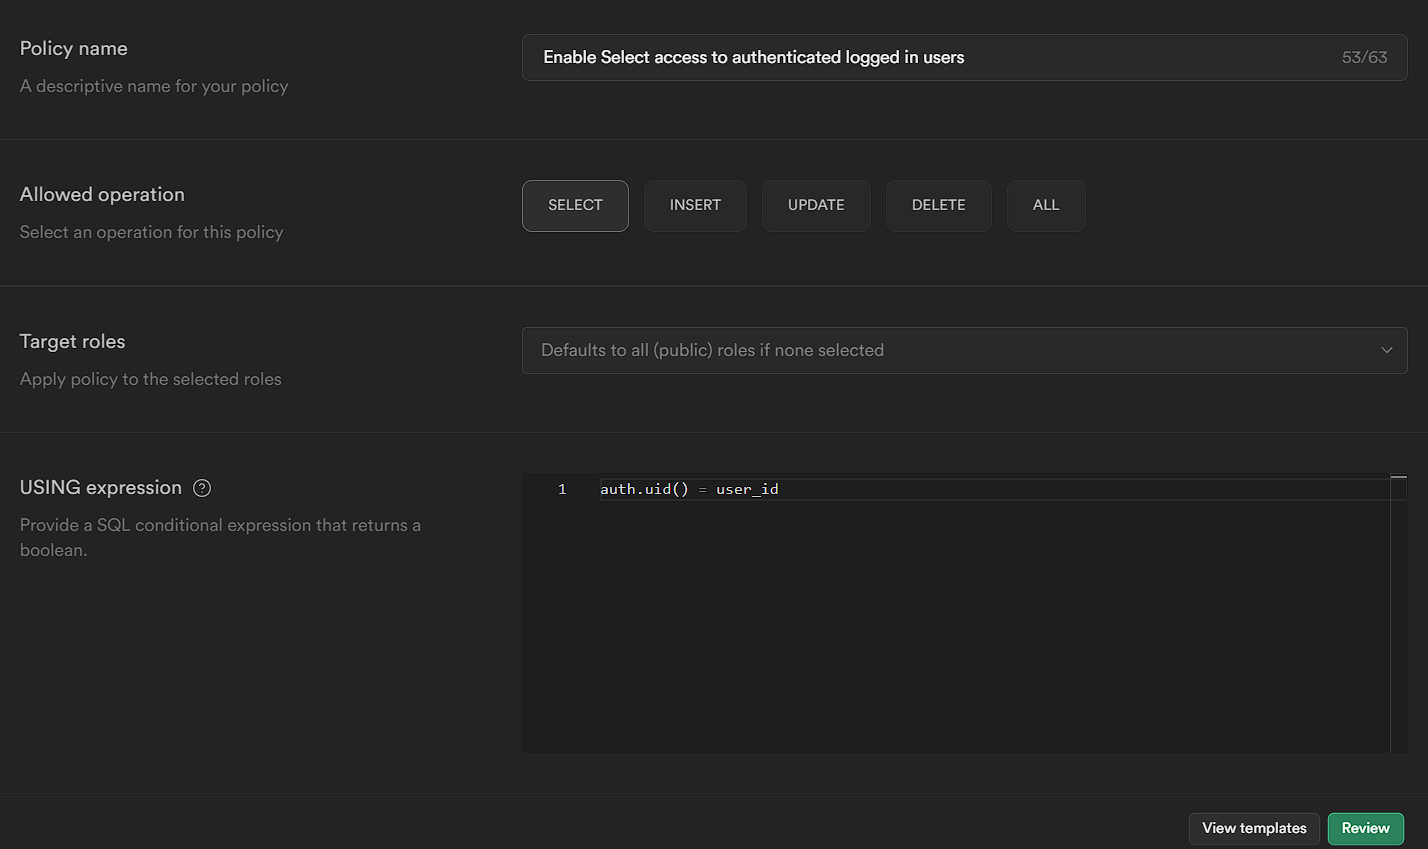
The policy is similar to the insert policy but for the Select operation. Save the policy.
Now open the ContactProvider.jsx and add the fetchAll operation to select the contacts.
import { createContext, useContext, useEffect, useState } from "react";
import { supabase } from "../supabase/client";

// Rest of the code
const ContactProvider = ({ children }) => {
 // Rest of the code
 const addContact = async (contact) => {
   const { data, error } = await supabase
     .from("contacts")
     .insert(contact)
     .select();
   if (data) {
     setContacts((prevContacts) => [...prevContacts, data[0]]);
     setMsg("Contact Added Successfully");
   }
   if (error) {
     setErrorMsg(error.message);
   }
 };

 const fetchAll = async () => {
   const { data, error } = await supabase.from("contacts").select();
   if (data) setContacts(data);
   if (error) setErrorMsg("Error in Fetching Contacts");
 };

 useEffect(() => {
   fetchAll();
 }, []);

 return (
   <ContactContext.Provider
     value={{
       contacts,
       msg,
       setMsg,
       errorMsg,
       setErrorMsg,
       addContact,
       fetchAll
     }}>
     {children}
   </ContactContext.Provider>
 );
};

export default ContactProvider;
In the fetchAll function we are performing a select operation. The select operation will return an array of results representing the rows in the table. If the operation succeeds, it will return the data object; otherwise, the error object. We are updating the contacts state when there is data or setting the errorMsg.
Also, we are calling the fetchAll function in the useEffect hook so that contacts are fetched from the DB whenever the component is mounted to the DOM or the page is refreshed.
Also, we have updated the addContact function to add the select operation at the end so that whenever a new contact is created, the same will be returned when the operation is successful. A point to note here is that we have used data[0] to get the contact because Supabase returns an array of data for the select operation. Since we are inserting only one contact, only one row will be returned. So we are getting the contact from the index 0.
Now, let’s implement the UI for displaying the contacts.
We will use bootstrap icons to indicate the edit and delete operations. To add bootstrap icons to our project, Open index.html and add the below line inside the <head> tag.
<link
 rel="stylesheet"
 href="https://cdn.jsdelivr.net/npm/bootstrap-icons@1.10.3/font/bootstrap-icons.css"
/>
That’s it. Let’s edit the ContactList.jsx page inside the pages directory. On this page, we will display all the contacts in a table view using react-bootstrap’s Table component. We will also add a button on the top right to Add a new contact. In the last column of the table, we will have two icons to edit and delete the contact.
As usual, the code for this change can be found on GitHub here.
At this point, the UI would look like this,

Implementing Update Operation
The Update operation in React is an equivalent of a database update operation. First, we must set up RLS for the update operation in Supabase.
Open the project in Supabase. Then go to Authentication in the side navigation bar. Click on Policies and then click on New Policy. In the screen that pops up, click on For Full Customization. In the next screen, enter the values as described in the image below.
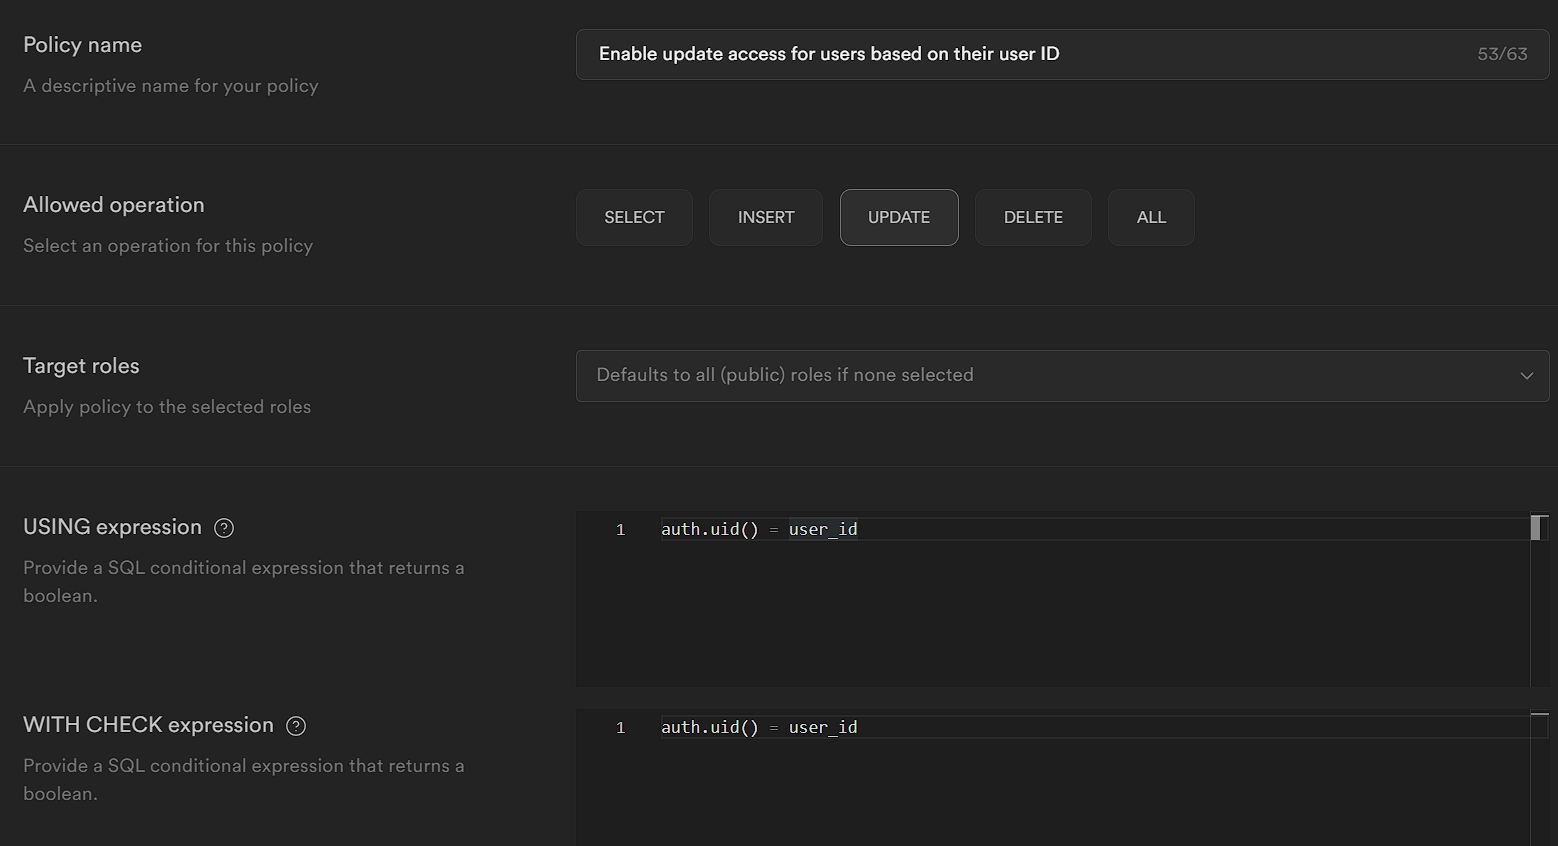
Let’s add update functionality to our app. Open ContactProvider.jsx and add the following function.
// Rest of the code
const ContactProvider = ({ children }) => {
 // Rest of the code
 const editContact = async (contact, id) => {
   const { data, error } = await supabase
     .from("contacts")
     .update(contact)
     .eq("id", id)
     .select();
   if (error) {
     setErrorMsg(error.message);
     console.error(error);
   }
   if (data) {
     setMsg("Contact Updated");
     const updatedContacts = contacts.map((contact) => {
       if (id === contact.id) {
         return { ...contact, ...data[0] };
       }
       return contact;
     });
     setContacts(updatedContacts);
   }
 };

 return (
   <ContactContext.Provider
     value={{
       contacts,
       msg,
       setMsg,
       errorMsg,
       setErrorMsg,
       addContact,
       fetchAll,
       editContact
     }}>
     {children}
   </ContactContext.Provider>
 );
};

export default ContactProvider;
We have created an async editContact function which takes in two parameters, contact, the contact to be updated, and id, the id of the contact. In the function body, we call the update method by passing the contact object, and we add the condition where the id equals the id of the contact using the eq filter. The eq method takes in two parameters, the column name and the value to be checked against the column. There are other filters, like neq (not equals), gt (greater than), etc. You can check the official Supabase documentation for more such filters here.
Then we get the updated contact back by using the select() method at the end. So, when the update operation is successful, the data variable will contain the list of rows updated. If the operation fails, the error variable will contain the error information. Based on that, we are updating our contacts state and errorMsg state. For updating the contacts in an immutable way, we are creating an updated array by transforming the contacts array using the map operation and checking if the contact’s id matches with the id passed to the editContact. If it matches, we are returning the updated contact, otherwise, we are returning the same contact. Then we update the contacts state using this updatedContacts variable.
For the UI changes related to the edit functionality, refer to the GitHub commit here and make the necessary changes.
In the above commit, in the ContactList page, we have added an onClick event handler to the edit icon, which upon clicking, will open up the modal with the corresponding contact data pre-filled. Also, in index.css, we have added styles to make the cursor a pointer when we hover over the icon. And in the ContactModal, we have updated the code to handle the edit case.
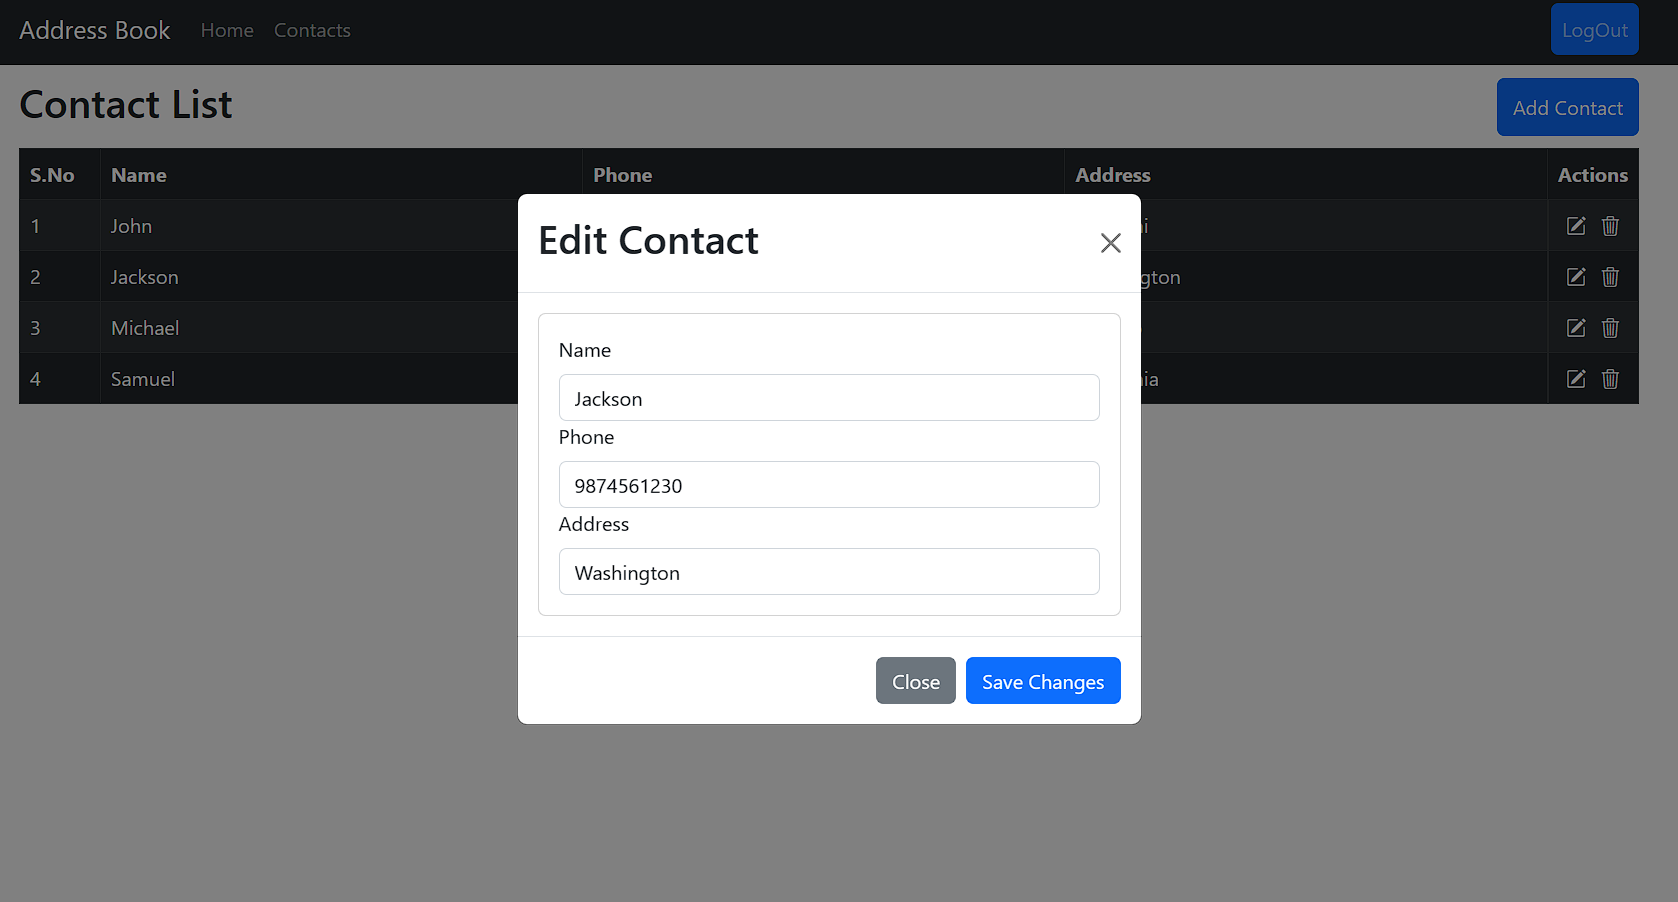
We can edit the data and click on Save Changes. The update query will be run, and the data will be updated. We can close the modal and see the data changes.
Implementing Delete Operation
The Delete operation in React is an equivalent of a database delete operation. First, we need to set up RLS for the delete operation in Supabase.
Open the project in Supabase. Then go to Authentication in the side navigation bar. Click on Policies and then click on New Policy. In the screen that pops up, click on For Full Customization. In the next screen, enter the values as described in the image below.
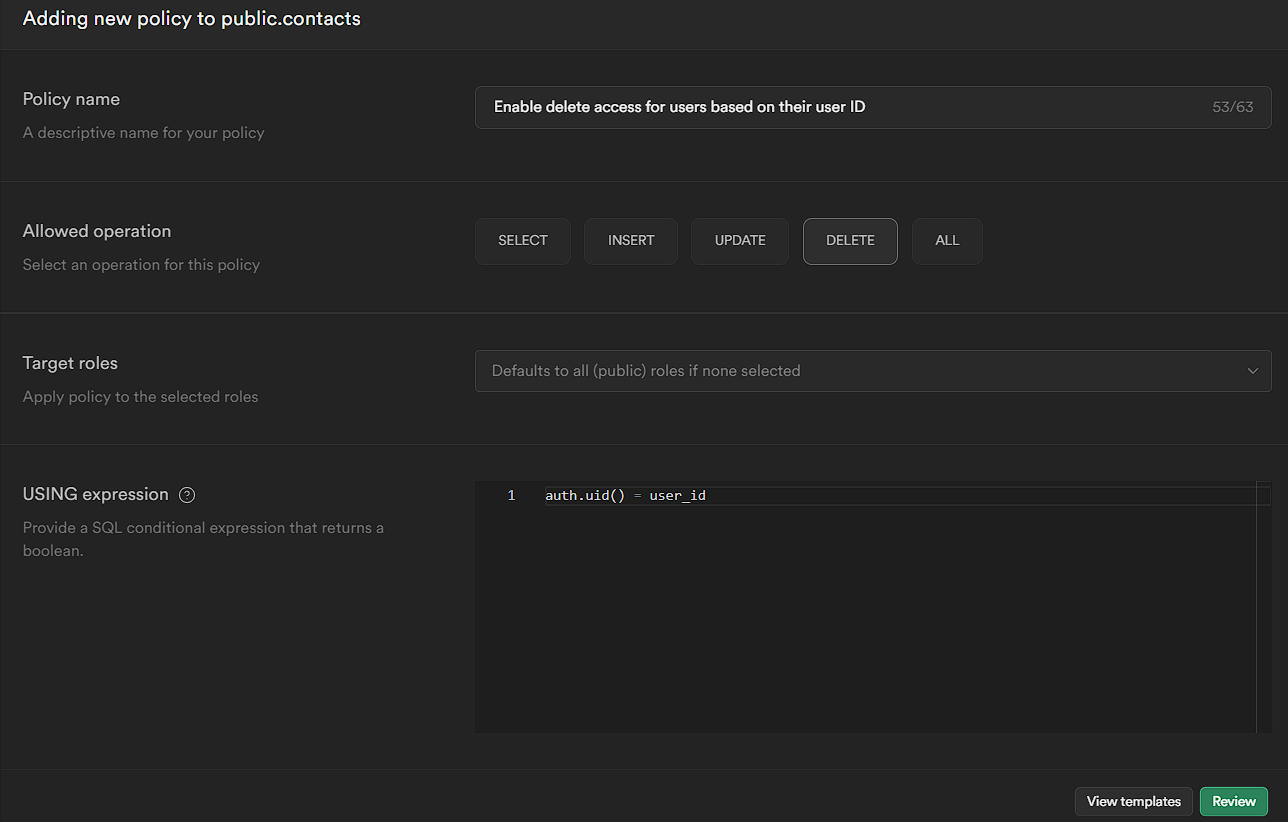
Let’s add delete functionality to our app. Open ContactProvider.jsx and add the following function.
// Rest of the code
const ContactProvider = ({ children }) => {
 // Rest of the code
 const deleteContact = async (id) => {
   const { error } = await supabase.from("contacts").delete().eq("id", id);
   if (error) {
     setErrorMsg(error.message);
   } else {
     setMsg("Contact Deleted Successfully");
     setContacts((prevContacts) =>
       prevContacts.filter((contact) => contact.id !== id)
     );
   }
 };

 return (
   <ContactContext.Provider
     value={{
       contacts,
       msg,
       setMsg,
       errorMsg,
       setErrorMsg,
       addContact,
       fetchAll,
       editContact,
       deleteContact
     }}>
     {children}
   </ContactContext.Provider>
 );
};

export default ContactProvider;
We have created an async deleteContact function which takes in one parameter, id, the id of the contact. In the function body, we call the delete with the condition where the id equals the id of the contact using the eq filter. We are getting an error object from Supabase. We will set the errorMessage state if there is an error. If there is no error, the delete operation is successful, so we will update the contacts state by using the filter method to create a new array that only includes the contacts that do not have the given ID. The updated array is then set as the new state for contacts. Using the functional form of setState with prevContacts ensures that the updated state is based on the previous state and prevents issues that could arise from asynchronous state updates.
Moving to the UI part, We will create another modal asking the user for confirmation before deleting the contact. It will be useful to prevent accidental deletions.
Then we will include the modal in the ContactList page.
As usual, the code changes can be found in the GitHub commit here.
This modal is similar to the ContactModal. It takes three props, show (a boolean to indicate if the modal is displayed or not), handleClose (a function to close the modal), and id (the ID of the contact to delete).
Inside the Modal we will display a message asking the user if they want to delete the contact. And we have two buttons, No and Yes for the user actions. We will delete the contact with the specified id or close the modal based on the user confirmation.
Like the edit icon, we have added the icon class to the delete icon and updated its onClick function so that whenever the delete icon is clicked, the ConfirmModal will be shown.
That’s it. When you click the delete icon for any contact, the modal will be displayed.
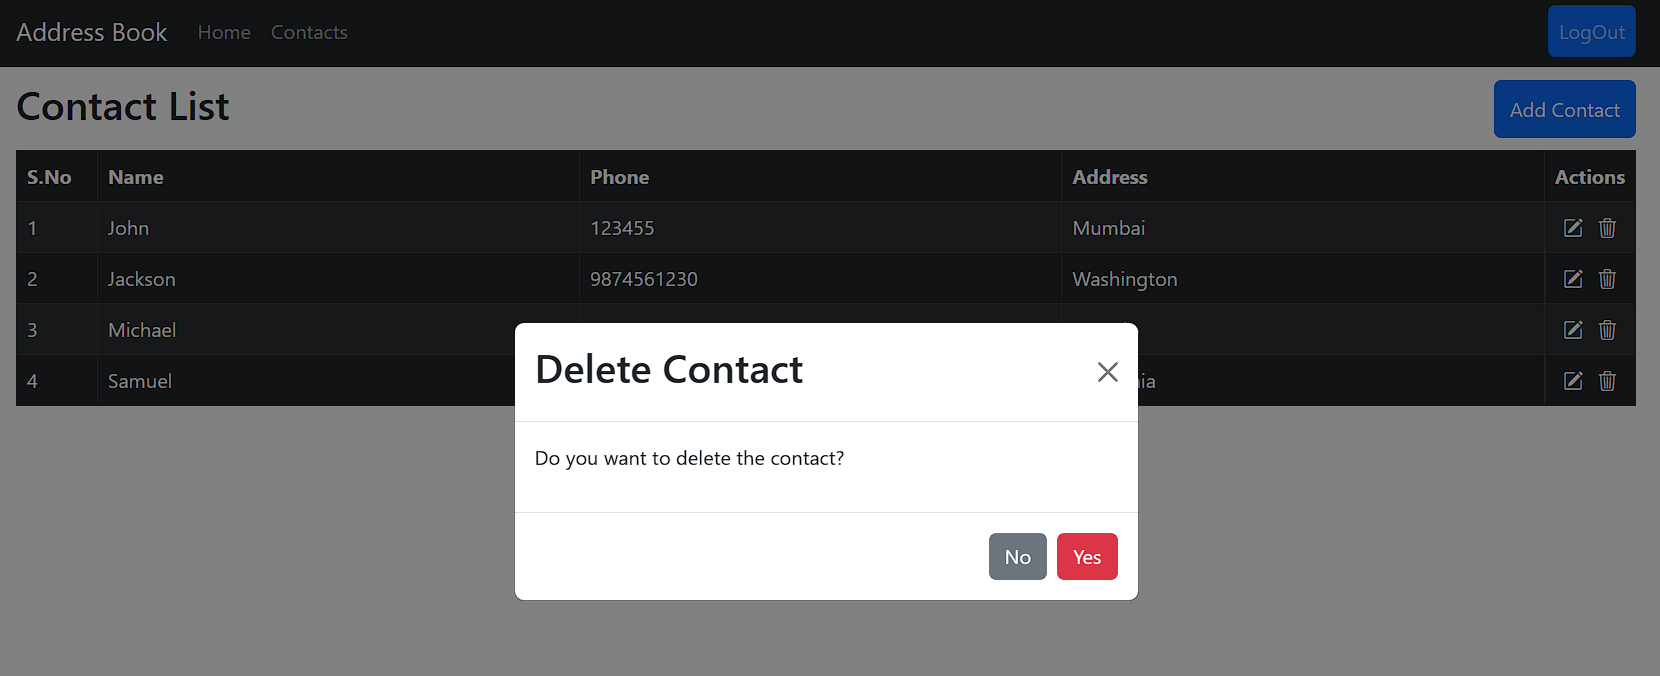
Once we click Yes, the contact will be deleted, and the modal will close automatically.
Conclusion
In this article, we explored how to build a basic CRUD application using React and Supabase. We walked through setting up a Supabase database, connecting a React application to it, and implementing CRUD operations with RLS. We also discussed how RLS can help enforce data access policies and ensure that users only have access to the data they are authorized to view, update, or delete.
The complete source code of this article can be found on my GitHub. If you find the code useful, star the repo.
As a next step, you can implement more complex CRUD operations, such as pagination, filtering, and sorting. Also, you can explore Supabase’s documentation to learn about more advanced features and integrations.

