Drag-and-drop events in JavaScript

Drag-and-drop is one of the most common ways we interact with computers today. Why? Because it is fast, fun, and easy. Now, if there is anything frontend developers love, it is an interactive user interface that is fast, fun, and easy. Hence, it should come as no surprise that there is a drag-and-drop API on the browser, and in this article, we will take a quick look at how it works so you can use it for your next big project.
At the end of this article, you will: -Learn about the HTML Drag and Drop API -Understand the function of each of the drag Events -Be able to apply the drag-and-drop functionality to your projects
The HTML Drag and Drop API
The HTML Drag and Drop API is the API that provides us with drag-and-drop functionality in the browser. It introduces two fundamental concepts: DragEvents and DataTransfer methods.
The DragEvents are a collection of seven events we can observe during drag-and-drop interactions on the browser. At the same time, the DataTransfer methods provide us with convenient ways to transfer data during a DragEvent.
To start with the HTML drag-and-drop API, set the attribute draggable to true on your HTML element of choice. Click on said HTML element on the screen, and move your cursor to drag.
<div class="content" draggable="true"></div>Note: <img/> and <a></a> tags are draggable by default
Drag Events
Drag Events are an extension of the mouse events provided to us by the HTML Drag and Drop API, and they are available on any draggable element. It consists of seven events that fire at different points during a drag-and-drop interaction.
Dragstart: This is the first event that fires once we drag a draggable element and fires once for every drag-and-drop operation.Drag: This event fires immediately after the dragstart and will fire continuously as we drag the element until we stop dragging it.Dragend: This event fires just once in any drag-and-drop event when we release the click button and stop dragging the element.
These three drag events are commonly attached directly to the draggable element.
Before we continue discussing the rest of the drag events, at this junction we must mention that within the browser, as with any other drag-and-drop systems, there are designated “dropzones” where a draggable item may be dropped. Outside of these dropzones, we cannot drop the item being dragged. While using the HTML Drag and Drop API, these dropzones are created by adding any of these three DragEvents onto the HTML element to become the dropzone. Any HTML element with any of these three events is an eligible dropzone by default.
Dragover: This event is fired as a draggable element moves over any valid dropzone’s surface.Dragenter: This event is fired when a draggable element intersects the surface of a valid dropzone while going towards it; basically, when a draggable element enters a dropzoneDragleave: This event is fired when a draggable element intersects the surface of a valid dropzone while going away from it. Basically, when a draggable element leaves a dropzone.Drop: The drop event is the penultimate event fired during a complete drag-and-drop interaction cycle(Dragendis the last). However, two conditions must be met for it to fire. First, the drop event will fire only if thee.preventDefault()is called on theDragoverevent. The second condition is that the drop event will only fire when a draggable element is released (dropped) over a valid dropzone.
Demo on Drag Events
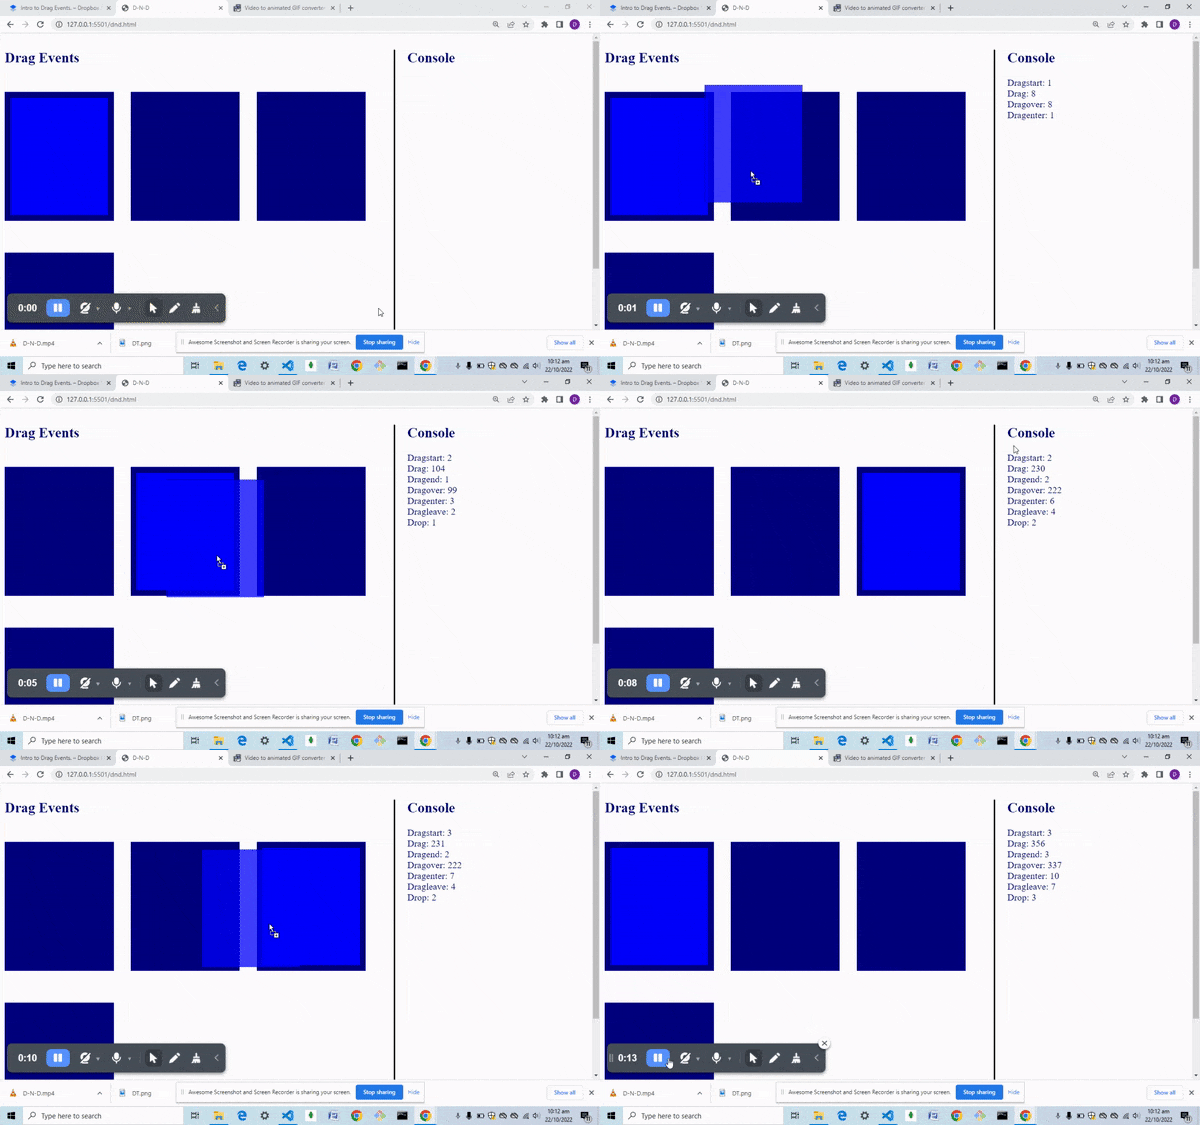
The drag events discussed are demonstrated in this simple application.
<!DOCTYPE html>
<html lang="en">
  <head>
    <meta charset="UTF-8" />
    <meta http-equiv="X-UA-Compatible" content="IE=edge" />
    <meta name="viewport" content="width=device-width, initial-scale=1.0" />
    <title>D-N-D</title>
    <style>
      section {
        display: flex;
      }
      .console {
        border-left: 3px solid black;
        width: 30vw;
        height: 100vh;
        padding-left: 20px;
        color: navy;
      }
      .display {
        width: 70vw;
        height: 100vh;
        color: navy;
      }
      .dropzone {
        display: inline-block;
        width: 25%;
        height: 200px;
        margin: 25px;
        margin-left: 0;
        padding: 10px;
        background-color: navy;
      }
      .content {
        width: 100%;
        height: 100%;
        background: blue;
      }
    </style>
  </head>
  <body>
    <section>
      <div class="display">
        <h1>Drag Events</h1>
        <div class="dropzone">
          <div class="content" draggable="true"></div>
        </div>
        <div class="dropzone"></div>
        <div class="dropzone"></div>
        <div class="dropzone"></div>
      </div>
      <div>
        <div class="console">
          <h2>Console</h2>
          <div id="Dragstart"></div>
          <div id="Drag"></div>
          <div id="Dragend"></div>
          <div id="Dragover"></div>
          <div id="Dragenter"></div>
          <div id="Dragleave"></div>
          <div id="Drop"></div>
        </div>
      </div>
    </section>

    <script>
      const dropzone = document.querySelectorAll(".dropzone");
      const content = document.querySelector(".content");
      let dragstart = 0;
      let drag = 0;
      let dragend = 0;
      let dragover = 0;
      let dragenter = 0;
      let dragleave = 0;
      let drop = 0;
      content.addEventListener("dragstart", (e) => {
        console.log(e);
        dragstart++;
        Dragstart.innerText = `Dragstart: ${dragstart}`;
      });
      content.addEventListener("drag", (e) => {
        drag++;
        Drag.innerText = `Drag: ${drag}`;
      });
      content.addEventListener("dragend", (e) => {
        console.log(e);
        dragend++;
        Dragend.innerText = `Dragend: ${dragend}`;
      });

      dropzone.forEach((dropzone) => {
        dropzone.addEventListener("dragenter", (e) => {
          console.log(e);
          dragenter++;
          Dragenter.innerText = `Dragenter:  ${dragenter}`;
        });
        dropzone.addEventListener("dragleave", (e) => {
          console.log(e);
          dragleave++;
          Dragleave.innerText = `Dragleave:  ${dragleave}`;
        });
        dropzone.addEventListener("dragover", (e) => {
          // necessary for drop event to fire
          e.preventDefault();
          dragover++;
          Dragover.innerText = `Dragover:  ${dragover}`;
        });
        dropzone.addEventListener("drop", (e) => {
          console.log(e);
          drop++;
          Drop.innerText = `Drop: ${drop}`;
          //move draggable div to target dropzone
          dropzone.append(content);
        });
      });
    </script>
  </body>
</html>

The result of running the application is shown in the recording above. The application features four boxes of equal sizes (dropzones) and one smaller box (draggable element). ‘Drag and Drop’ the smaller box across the screen and into the dropzones. While doing that, observe the other portion of the screen titled ‘console’ to see what event fires and when it fires.
Note: The smaller box is manually appended to the dropzones using the append() method, but in the next section we will look at how to use the built-in drag events dataTransfer method to perform similar actions.
Session Replay for Developers
Uncover frustrations, understand bugs and fix slowdowns like never before with OpenReplay — an open-source session replay tool for developers. Self-host it in minutes, and have complete control over your customer data. Check our GitHub repo and join the thousands of developers in our community.
Data Transfer with Drag Events
When we log the DragEvent to the console, as expected, we see a very large object with a lot of information on the dragEvent. Still, the most important property we are interested in is the dataTransfer property.
On this dataTransfer property, which is an object, we also have a setData() and a getData() method.
-
setData(): This method allows us to add(set) data on the draggable item. Common practice is to use this method in thedragstartevent to add data values to the draggable item. ThesetData()method takes two arguments. The MIME type and the value of the data are to be added in string format. ThesetData()method can be used multiple times, but while being used multiple times, the data will be overwritten if the MIME type is the same in two or more cases. The data is stored in thedataTransfer.itemsarray. -
getData(): This method allows us to take(get) the data we have previously set on a draggable item from thedataTransfer.itemsarray. The method is usually available on thedragStartanddropevents. However, standard practice is to use this method in the drop event to get data values from the draggable item. This practice is based on security implications. ThegetData()method takes one argument: the MIME type of data we want to retrieve.
Taking advantage of these two methods, we can transfer data using a drag-and-drop interaction. Now, this data could be anything we want, but usually, it would be information about the draggable item itself. Let’s look at a simple application demo.
<!DOCTYPE html>
<html lang="en">
  <head>
    <meta charset="UTF-8" />
    <meta http-equiv="X-UA-Compatible" content="IE=edge" />
    <meta name="viewport" content="width=device-width, initial-scale=1.0" />
    <title>D-N-D</title>
    <style>
      .display {
        display: flex;
      }
      .dropzone {
        display: block;
        width: 25%;
        height: 200px;
        margin: 25px;
        margin-left: 0;
        padding: 10px;
        background-color: navy;
        overflow: auto;
        color: aqua;
        font-size: large;
      }
      .container {
        display: block;
        width: 25%;
      }
      .content {
        width: 80%;
        height: 25%;
        margin: 1em;
      }
      .blue {
        background: blue;
      }
      .yellow {
        background: yellow;
      }
      .red {
        background: red;
      }
    </style>
  </head>
  <body>
    <h1>Drag Events:Data Transfer</h1>
    <div class="display">
      <div class="container">
        <div id="red" class="content red" draggable="true"></div>
        <div class="content blue" draggable="true"></div>
        <div class="content yellow" draggable="true"></div>
      </div>
      <div class="dropzone"></div>
      <div class="dropzone"></div>
      <div class="dropzone"></div>
    </div>
    <script>
      const dropzone = document.querySelectorAll(".dropzone");
      const content = document.querySelectorAll(".content");
      content.forEach((content) => {
        content.addEventListener("dragstart", (e) => {
          const color = window.getComputedStyle(e.target).backgroundColor;
          let colorName = "";
          switch (color) {
            case "rgb(255, 0, 0)":
              colorName = "red";
              break;
            case "rgb(0, 0, 255)":
              colorName = "blue";
              break;
            case "rgb(255, 255, 0)":
              colorName = "yellow";
              break;
            default:
              colorName = "none";
              break;
          }
          //Different mime types list.SAVES TO ITEMS
          e.dataTransfer.setData(
            "text/html",
            `<p> This box has a color of ${colorName}</p>`
          );
        });
      });
      dropzone.forEach((dropzone) => {
        dropzone.addEventListener("dragover", (e) => {
          // necessary for drop event to fire
          e.preventDefault();
        });

        dropzone.addEventListener("drop", (e) => {
          //getdata() is only available here in the drop event in chrome
          const data = e.dataTransfer.getData("text/html");
          e.target.innerHTML += data;
          //a look into the dataTransferitems. items.kind is usually string or a file.
          //items.type is the MIME type.
          for (let i = 0; i < e.dataTransfer.items.length; i++) {
            let items = e.dataTransfer.items[i];
            console.log(i, items.kind, items.type);
          }
          //dataTransfer.items.length will increase each time you use setData to add more data.
          //This will not reflect on Chrome at the time of writing.
          console.log(e.dataTransfer, e.dataTransfer.items);
        });
      });
    </script>
  </body>
</html>

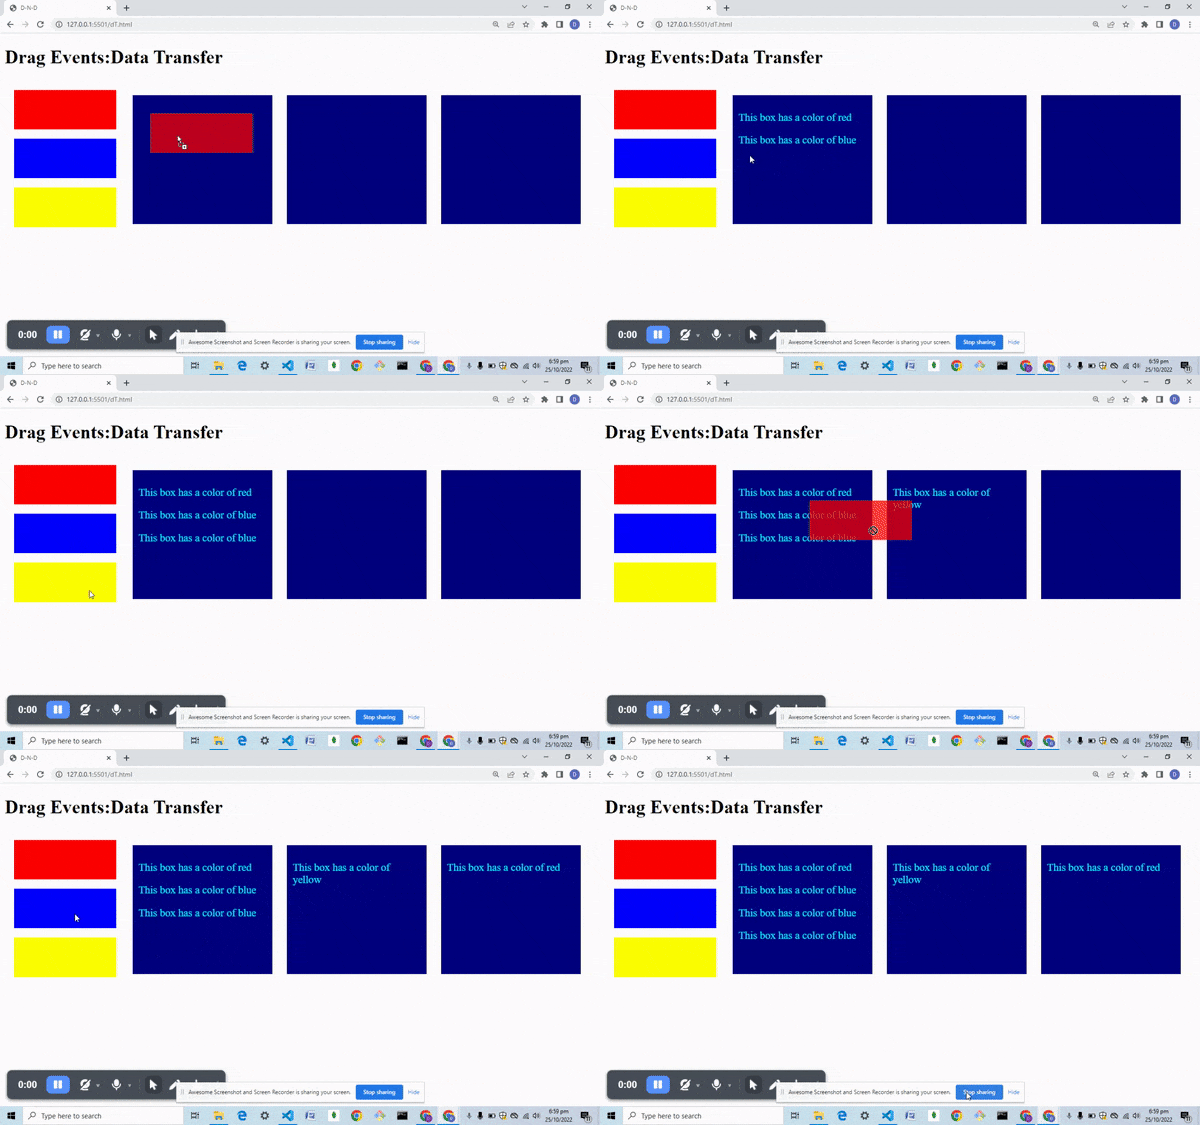
The simple application features three small colored draggable boxes and three dropzones. When we drag and drop any of the smaller boxes, the application lets us record (in HTML text) the color of any boxes in the dropzone in which it was dropped.
Issues with Chrome
It is worth noting that some issues and peculiarities have been recorded while working with the HTML Drag and Drop API on Chrome.
- In the first application demo on
dragEvents, I used a pseudo console to display the events being fired(instead of logging to the developer console) because I could not drag and drop on a chrome version while working with the Chrome Dev tools open. - While working with the
dataTransferobject, the Chrome Dev console does not record the addition of data using thesetData()method. However, the method still works. ThegetData()method is only accessible in Chrome on thedropevent for certain security concerns.
Summary
The HTML Drag and Drop API is the easiest way to introduce drag-and-drop functionality in your websites. The availability of Drag Events and the methods on the dataTransfer object ensures you have fine-grained control over what happens during drag-and-drop interaction. Hence, do not hesitate to use this API whenever you feel like adding that extra interactivity to your web app.
To learn more about the HTML drag-and-drop API, visit the MDN documentation of the HTML drag-and-drop API: https://developer.mozilla.org/en-US/docs/Web/API/HTML_Drag_and_Drop_API
To get the codes used in the demo apps, use the link below and select the master branch: https://github.com/DGold3680/drag-and-drop.git
A TIP FROM THE EDITOR: For more on drag-and-drop wit popular frameworks, don’t miss our Drag-And-Drop With Angular Material and Create a Drag-and-Drop Zone in React with react-dropzone articles.


