Lifecycle Hooks in Angular - A Complete Guide

Angular lifecycle hooks are a unique feature that lets us “hook into” and execute code at a particular component or directive lifecycle event.
When it adds, modifies, or deletes components and directives, Angular maintains them for us. We may have more control over our program with the help of lifecycle hooks.
To achieve this, we add a few specific hook methods to our component or directive that are prefixed with ng. Hooks for components or directives and hooks for child components are the two categories into which these hooks fall.
What are Lifecycle Hooks in Angular?
Angular’s lifecycle hooks’ root component is built and rendered as soon as the application is launched. Then it produces and renders its progeny as well as their progeny. A tree is used to organize the components.
After loading the components, Angular starts creating the view. Among other things, the input attributes must be validated, data bindings and expressions must be assessed, and projected content must be produced. As soon as the component is no longer needed, Angular removes it from the document object model (DOM); Angular removes it from the document object model (DOM).
Lifecycle hooks from Angular let us know when specific events take place.
Angular lifecycle hooks are callback functions that Angular calls during an Angular component’s lifecycle.
Why do We need Lifecycle Hooks?
With the help of contemporary front-end frameworks, the application can change states. Data drive the modifications. These technologies engage the data, changing the state as a result. There are numerous distinct instances when particular assets become accessible with every state transition.
The template might be prepared at one time, while the data uploading may be completed at another. A method of detection is needed while coding for every instance. Lifecycle hooks provide an answer to this. Numerous lifecycle hooks are included in modern front-end frameworks.
How to Use Lifecycle Hooks?

Comment on this element or directive. hooks into a process’s lifecycle Create a straightforward component that will be used to implement a method to connect to ngOnInit.
An Angular project can be established using the Angular CLI. Turn on the app’s component.
Lifecycle Hooks for Component or Directives
The smallest units of a component tree’s building blocks in Angular are called components. This makes it incredibly simple for us to create and manage our software.
Components are the classes with @component looks like.
@Component({
  selector: "app-comp",
  template: `<div>Hello World</div>`,
  styles: "
})

class HelloWorld implements OnInit {
  //...
}
Directives are the components, but it operates on the non-UI part of the DOM structure. Directives are the classes decorated with a @Directive class decorator.
The examples of in-built directives are *ngFor and *ngIf.
Here are the lifecycle hooks for components or directives.
Constructor()
It is used because our components or directives are the JavaScript classes with either an @Component or @Directive. So this constructor is called when a component is instantiated and used by the new keyword.
OnChanges()
The onChanges method is a lifecycle hook, called when any data-bound property of directive changes.
Now, let’s take an example Shopping has the input property bike.
@Component({
 selector: 'shopping',
 template: `
 <div *ngFor= "let bike of bikes">
 {{bike}}
 </div>
 `
})
export class Shopping implements OnChanges {
 @Input() bike
 ngOnChanges() {
 console.log("The bike property changed")
 }
}
@Component({
 // ...
 template: `
 <bcomp [bikes]="bike"></shopping>
 `
})
export class App {
 bikes = ["Harley Davidson", "Davidson"]
}
OnInit()
After Angular has initialized all data-bound properties of a directive, a lifecycle hook called OnInit is called. Create a function called ngOnInit() to handle further initialization needs.
When the component’s initial change detection is performed, this hook is invoked. It is turned off after the initial run and will never be used again. It’s recommended to include our initialization logic here.
We will implement the onInit interface and add the ngOnInit method to the component.
@Component({
//...Code examples
})

export class HelloWorld implements OnInit{
ngOnInit(){
   console.log("Initialization is called")
 }
}
OnDestroy
When a directive, pipe, or service is destroyed, the lifecycle hook OnDestroy is called. Use this for any special cleanup procedures that must be carried out when the instance is destroyed.
This hook is used chiefly to unsubscribe from observable streams and disconnect event handlers to prevent memory leaks.
Session Replay for Developers
Uncover frustrations, understand bugs and fix slowdowns like never before with OpenReplay — an open-source session replay tool for developers. Self-host it in minutes, and have complete control over your customer data. Check our GitHub repo and join the thousands of developers in our community.
Lifecycle Hooks for Children Components
Components can have both parent and child components because Angular is organized like a tree. Alternatively put, what the component renders and what the component renders.
The hooks we’ll be learning about here are the hooks that will be invoked during particular child component lifecycle events. Developers can add their custom code to the hooks declared in the parent component to increase the functionality of their component.
The initialization of the child component’s content, the initialization, and rendering of the child component’s UI or view, or the execution of the child component’s change detection all trigger the calling of hooks in the parent component.
AfterContentInit
When the content of a component or directive has been initialized, AfterContentInit is invoked. The elements or directives projected in-between the <ng-content> and </ng-content> tags are referred to as “content” in this instance:
@Component({
 selector: 'secondcomponent',
 template: `
 <div>This is a second Component</div>
 `
})
export class SecondComponent {}
@Component({
 selector: 'firstcomponent',
 template: `
 <ng-content></ng-content>
 `
})
export class FirstComponent implements AfterContentInit {
 ngAfterContentInit() {
 // ...
 }
}
@Component({
 template: `
 <firstcomponent>
 <secondcomponent></secondocomponent>
 </firstcomponent>
 `
})
export class App {}
Any elements between the FirstComponent’s tags <firstcomponent> and </firstcomponent> inside the ng-content tag will be projected. The Second Component is now projected in the acomp tag of the First component. The ngAfterContentInit hook will be called in the AComponent when the SecondComponent is initialized.
AfterContentChecked
This hook is activated following the completion of the check by the default change detector for the component or directive projected into the component using the ng-content tag:
@Component({
 selector: 'firstcomponent',
 template: `
 <ng-content></ng-content>
 `
})
export class FirstComponent implements AfterContentInit {
 ngAfterContentInit() {
 // ...
 }
}
@Component({
 template: `
 <firstcomponent>
 {{data}}
 </firstcomponent>
 `
})
export class App implements AfterContentChecked {
 data: any
 ngAfterCOntentChecked() {
 //...
 }
}
The App component has a data property that is inside the FirstComponent. When the data property changes, ngAfterContentChecked will be called.
AfterViewInit
After a component’s view and all of its child views have been generated and fully initialized, this hook is invoked.
This hook is useful when we wish to use ViewChild/ViewChildren to access a component or directive instance in our component.
AfterViewChecked
The change detector of a component/child directive’s component is performed for checks after this hook is called.
Watch out for setting any variables here that are tied to the template. You will get the error message “Expression has changed after it was checked” if you try this.
@Component({
 selector: 'firstcomp',
 // ...
})
export class AComponent {
 @Input() data
 firstCompMethod() {
 return this.data * 9
 }
}
@Component({
 template: `
 <div>
 {{aCompData}}
 <firstcomp [data]="data" #firstcomp></firstcomp>
 <button (click)="changeData()"></button>
 </div>
 `
})
export class App implements AfterViewChecked {
 @ViewChild('firstcomp') firstcomp: FirstComponent
 data: any
 firstcompData:any
 changeData() {
 this.data = Date.now()
 }
 ngAfterViewChecked() {
 //...
 this.firstcompData = this.firstcomp.firstCompMethod()
 }
}
When we click the changeData button, we change the data binding for FirstComponent's input binding such that the FirstComponent's firstCompMethod result is displayed in the firstCompData.
A reference error could occur if the method is called from any other location since Angular might not have finished running CD on the FirstComponent. Because the ngAfterViewInit method will be called after the FirstComponent's CD run is complete, we implemented the AfterViewChecked interface and added it.
Angular Lifecycle Hooks Examples
The lifespan of a component or directive can be tapped into by Angular applications using lifecycle hook methods to establish new instances, start change detection when necessary, respond to changes during change detection, and clean up before instance destruction.
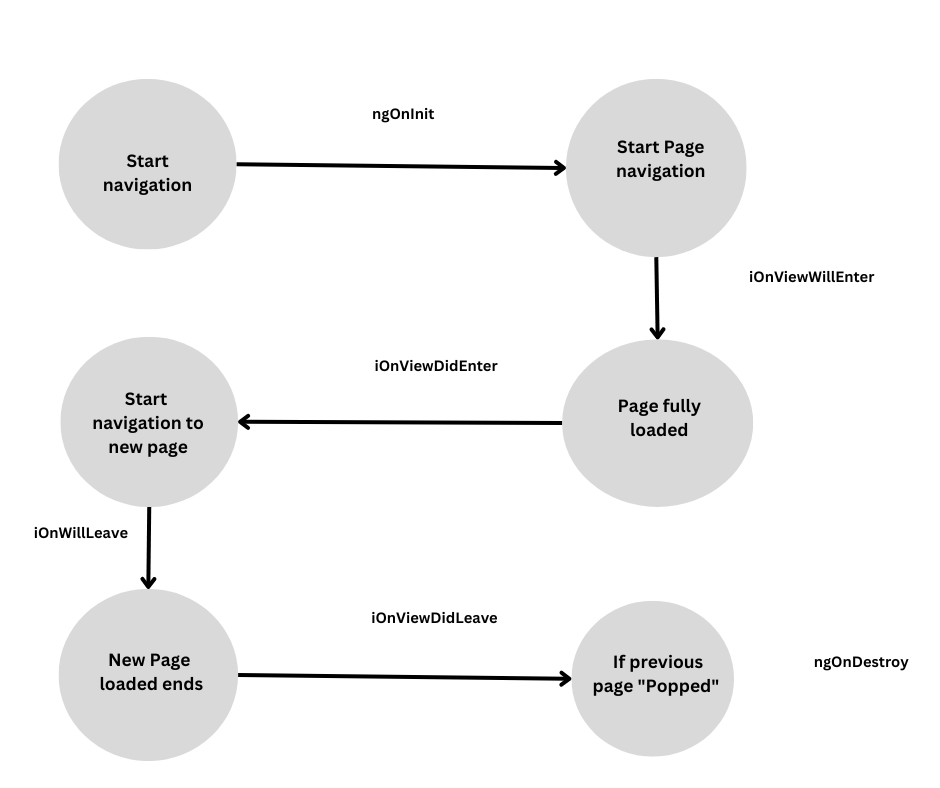
Angular calls these hook methods in the following order:
-ngOnChanges: When an input/output binding value changes.
-ngOnInit: After the first ngOnChanges.
-ngDoCheck: Developer’s custom change detection.
-ngAfterContentInit: After component content is initialized.
-ngAfterContentChecked: After every check of component content.
-ngAfterViewInit: After a component’s views are initialized.
-ngAfterViewChecked: After every check of a component’s views.
-ngOnDestroy: Just before the component/directive is destroyed.
Every hook is being watched over and recorded to the console. There are distinct fields for the message and content. Both properties are to be utilized as input and property to be projected as content is sent to the kid component.
The hideChild form option can add or delete the ChildComponent from the DOM. This uses the ngIf directive.
Use the Directive to watch the DOM.
The spy example shows how components and directives may be used using the hook technique. To identify an element that has been viewed in the current view, SpyDirective implements two hooks: ngOnInit() and ngOnDestroy().
This template implements SpyDirective on a <div> in the native SpyComponent-managed ngFor hero repeater.
Such a spy directive can provide you access to information about a DOM object that you cannot directly edit. You cannot alter any third-party components or the original div’s implementation. However, using a directive, you may see these components.
The directive defines the ngOnInit() and ngOnDestroy() hooks, which use the injected LoggerService to log messages to the parent.
There is no initialization or cleanup carried out by the instance. By recording the instructions when they are instantiated and destroyed, it keeps track of an element’s appearance and removal in the scene.
src/app/spy.directive.ts
content_copylet nextId = 1;

// Spy on any element to which it is applied.
// Usage: <div appSpy>...</div>
@Directive({selector: '[appSpy]'})
export class SpyDirective implements OnInit, OnDestroy {
  private id = nextId++;

  constructor(private logger: LoggerService) { }

  ngOnInit() {
    this.logger.log(`Spy #${this.id} onInit`);
  }

  ngOnDestroy() {
    this.logger.log(`Spy #${this.id} onDestroy`);
  }
}
Any parent or component element can be given the spy command to simultaneously observe how it is initialized and destroyed as that element. It is connected to the repeating hero <div> in this instance:
src/app/spy.component.html
<p *ngFor= "let hero of heroes" appSpy>
  {{hero}}
</p>
With an entry in the log, each spy creation and demolition hook denotes the arrival and disappearance of an attached hero <div>. A new hero <div> is created when a hero is added, and that event is logged by ngOnInit() on the spy.
Clearing the list of heroes using the reset button. Angular simultaneously deletes all hero <div> elements’ spy directives and removes them from the DOM. The ngOnDestroy() method of the spy records its final moments.
Sequence and frequency of all lifecycle events
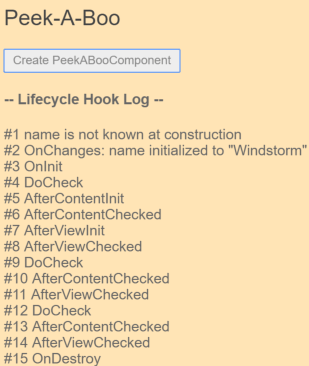
PeekABooComponent exposes every hook in a component to demonstrate how Angular invokes hooks in the expected sequence.
The status of the log is shown in the following screenshot following the clicks of the Create and Destroy buttons.

Following the specified hook calling order, the log messages appear in the following order: onchange, oninit, doCheck (3 times), afterContentInit, afterContentChecked (3 times), afterViewInit, afterViewChecked (3 times), and onDestroy.
It should be noted that the log verifies that the input property (the name property) was not created with a specified value. The onInit() method has access to input properties for additional initialization.
The log would display another hero once the user hits the Update Hero button.
OnChange, AfterContentCheck, and AfterViewCheck are two further triples of DoCheck. It’s vital to keep the reasoning in these three hooks as simple as possible because they frequently work.
Use component and directive hooks together
In this illustration, a CounterComponent logs a change every time the parent component increases the value of its InputCount property using the ngOnChanges() method.
This example uses SpyDirective to examine the generation and deletion of log entries in the CounterComponent log from the previous example.
Using the Change detection hooks
Whenever it notices a change in the input properties, Angular executes the ngOnChanges() function of the component or directive. This is shown by watching the onchange() hook in the onchange example.
on-changes.component.ts (excerpt)
content_copyngOnChanges(changes: SimpleChanges) {
  for (const propName in changes) {
    const chng = changes[propName];
    const cur  = JSON.stringify(chng.currentValue);
    const prev = JSON.stringify(chng.previousValue);
    this.changeLog.push(`${propName}: currentValue = ${cur}, previousValue = ${prev}`);
  }
}
The object that maps each changed property name to a straightforward change object holding the current and previous property values is passed to the ngOnChanges() method. This hook records the modified properties after iterating over them.
Hero and power.src/app/on-changes.component.ts are the input properties of the example component OnChangesComponent.
content_copy@Input() hero!: Hero;
@Input() power = '';
The host OnChangesParentComponent binds to them as follows.
src/app/on-changes-parent.component.html
content_copy<on-changes [hero]="hero" [power]="power"></on-changes>
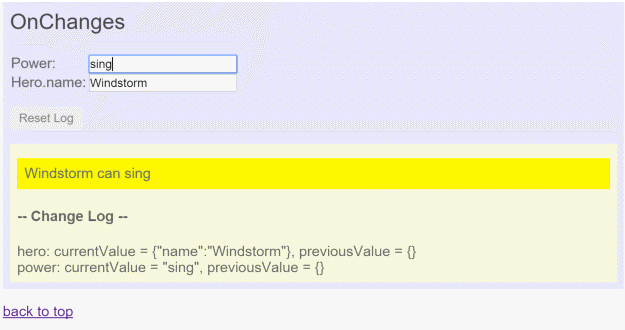
Here is the sample example below.

The string value of the power property change is displayed in the log entries. But remember that the ngOnChanges() method misses updates to the hero. This is because Angular only fires the hook when the value of the input property changes.
In this instance, a hero is the input property, and a reference to the hero object is the value of the hero property. When the name property’s value changed, the object reference did not.
Conclusion
Keep in mind that each hook has requirements that must be satisfied. Regardless, they will always carry out their actions one after the other. As a result, hooks are predictable enough to be used even when some do not work.
Timing the execution of a class is simple with lifecycle hooks. They enable developers to monitor the location of change detection and the appropriate responses for the application. Code that needs load-based dependencies that become available only gradually causes them to stall.
Modern front-end frameworks are characterized by the component lifecycle. By offering the aforementioned hooks, Angular outlines its lifecycle.
A TIP FROM THE EDITOR: Need help figuring out what framework to use? Read Angular, React, Vue — A Three-Way Comparison for help on this decision!


