Processing CSV files with Papaparse


Behind the scenes of nearly every digital ecosystem lies a humble CSV file, quietly orchestrating data flow with precision and efficiency. While other formats clamor for attention with their flashy features, CSV files remain steadfast in their simplicity and reliability - the unsung heroes of data management. This article explores CSV work using a powerful tool called
PapaParse.

Discover how at OpenReplay.com.
We will begin this article by looking at what CSV files are, what they look like, and how they are used in real-world scenarios. Then, we will demonstrate how we can efficiently work with CSV files in our corner of the digital landscape as front-end web developers.
What are CSV Files?
CSV, short for Comma-Separated Values, is a file format used to store tabular data. Picture a spreadsheet, but instead of fancy formatting and colors, you have plain text arranged in rows and columns. Each line in a CSV file represents a row of data, and within each row, individual values are separated by a delimiter, typically a comma, which represents the columns. Now, you are probably wondering about two things: what does a CSV file look like? And what is a delimiter? Let us start with the first question.
Here is a simple example of a CSV file and the table it represents.
Name, Age, Country
John, 30, USA
Alice, 25, Canada
Bob, 35, UK| Name | Age | Country |
|---|---|---|
| John | 30 | USA |
| Alice | 25 | Canada |
| Bob | 35 | UK |
A CSV file often looks as the name suggests, with values separated by commas. The CSV file above represents the table below it, and as explained previously, each line in the file represents a row in the table, and the placement of the commas dictates the columns.
Understanding CSV Delimiters
Let us now discuss delimiters. In CSV files, a delimiter is a character or sequence of characters used to separate individual fields or values within each row. The delimiter serves as a marker to indicate where one value ends and the next begins. The most common delimiter used in CSV files is the comma (,), which is why the format is called Comma-Separated Values.
The reason why commas are commonly used as delimiters in CSV files stems from their historical precedence, dating back to the early days of computing when CSV files were first introduced and subsequent widespread support across all CSV-supporting software. However, despite the prevalence of commas as delimiters, there are certain scenarios where using a different delimiter may be preferred. A common scenario is one in which the data within the CSV file contains commas as part of the actual values (e.g., addresses, text fields). Here, using commas as delimiters can lead to parsing errors. In such cases, alternative delimiters such as tabs (\t), semicolons (;), or pipes (|) may be chosen to avoid ambiguity.
Common Use Cases of CSV Files
CSV files find application across a spectrum of scenarios within the realm of data management; the most common use cases include:
- Data Interchange: CSV files serve as a lingua franca for data exchange between disparate systems. Their simplicity and universality make them ideal for transferring information across platforms.
- Database Management: Many database systems offer native support for importing and exporting data in CSV format. This capability facilitates tasks such as data migration, backup, and interoperability between databases.
- Spreadsheet Integration: CSV files seamlessly integrate with popular spreadsheet software, including Microsoft Excel, Google Sheets, and LibreOffice Calc. They provide a convenient mechanism for importing external data sets for analysis and visualization.
- Web Development: In web development, CSV files often play a role in scenarios involving data import/export, user-generated content, and server-side processing. They offer a lightweight and standardized format for transmitting structured data online.
- Scientific Research: CSV files are the backbone of scientific research for storing experimental data, survey results, and observational findings. Their plain text format facilitates data sharing and collaboration across research communities.
Understanding CSV files’ inherent characteristics and common applications lays the groundwork for effective data management strategies. In the subsequent sections, we delve into the intricacies of handling CSV files in JavaScript using PapaParse, a versatile library renowned for its parsing prowess and processing capabilities.
Getting Started with PapaParse
Let us start with a demonstration on how to manage CSVs on the web. Thankfully, as front-end developers, there are a ton of packages to simplify any task you can imagine, and for CSV management, the award for the simplest and most efficient package, in my opinion, goes to PapaParse.
PapaParse is a powerful JavaScript library that simplifies CSV parsing and processing tasks, and it is recommended and easy to use for both experienced and novice developers. To start with PapaParse, you must include the PapaParse library in your HTML file. You can do this by adding the following script tag to your HTML file:
<script src="https://cdnjs.cloudflare.com/ajax/libs/PapaParse/5.3.0/papaparse.min.js"></script>However, if you are working with a framework like Nextjs and a package manager like npm you can use the command below.
npm i papaparseFor the rest of this article, we will use vanilla javascript for our implementation; however, you can easily follow along in your preferred javascript framework by replicating the functionality of the example codes within the confines of your framework of choice.
Importing CSV Files
To begin working with a CSV file, the first step has to be importing the CSV file into your web application. This is a common task, especially when dealing with user-generated data or external data sources. PapaParse simplifies this process by providing a convenient API for uploading and parsing CSV files.
Uploading and Parsing CSV Files
To allow users to upload CSV files and subsequently parse the uploaded file using PapaParse, you can implement an HTML file upload along with a JavaScript event handler that handles the parsing of the document once it has been uploaded.
<!DOCTYPE html>
<html lang="en">
  <head>
    <meta charset="UTF-8" />
    <meta name="viewport" content="width=device-width, initial-scale=1.0" />
    <title>CSV Demo</title>
    <script src="https://cdnjs.cloudflare.com/ajax/libs/PapaParse/5.3.0/papaparse.min.js"></script>
  </head>
  <body>
    <input type="file" id="file-input" />
    <script>
      document
 .getElementById("file-input")
 .addEventListener("change", function (event) {
          const file = event.target.files[0];
          Papa.parse(file, {
            complete: function (results) {
              console.log(results.data); // Parse CSV data and log the result to the console.
 },
 });
 });
    </script>
  </body>
</html>
This code above shows an HTML file input element with an event listener attached to it. The script listens for changes in the file input element and triggers the parsing of the uploaded CSV file using the parse method on the Papa object gotten from the PapaParse library. The parsed data is then available in the complete callback function, where you can perform further processing as needed - in our case, logging the result to the browser console.
To test out the script, we will upload our sample CSV file (from the introduction section) and examine the console to see what the parsed CSV document looks like.
Image showing a Parsed CSV File
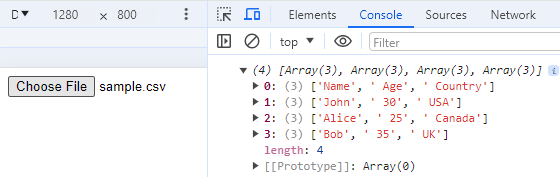 The image above shows the result of parsing our sample CSV file and logging it to the console. As you can see, the CSV file is parsed into a data structure that is an array of objects, where the array holds all the information in each table, and each object holds the values of each row.
Displaying CSV Data in HTML Tables
Once you have parsed the CSV data using PapaParse, most often you may want to display it on your webpage for visualization or further manipulation. The most common and basic visualization is as a table, and we can easily achieve that by using the code implementation below:
<!DOCTYPE html>
<html lang="en">
  <head>
    <meta charset="UTF-8" />
    <meta name="viewport" content="width=device-width, initial-scale=1.0" />
    <title>CSV Demo</title>
    <script src="https://cdnjs.cloudflare.com/ajax/libs/PapaParse/5.3.0/papaparse.min.js"></script>
  </head>
  <body>
    <input type="file" id="file-input" />
    <div id="csv-table-container"></div>
    <script>
      document
 .getElementById("file-input")
 .addEventListener("change", function (event) {
          var file = event.target.files[0];
          Papa.parse(file, {
            complete: function (results) {
              var csvData = results.data;
              var tableHtml =
                '<table style="border-collapse: collapse; width: 100%;">'; // Inline styles for table
              csvData.forEach(function (row) {
                tableHtml += "<tr>";
                row.forEach(function (cell) {
                  tableHtml +=
                    '<td style="border: 1px solid black; padding: 8px;">' +
                    cell +
                    "</td>"; // Inline styles for cells
 });
                tableHtml += "</tr>";
 });
              tableHtml += "</table>";
              document.getElementById("csv-table-container").innerHTML =
                tableHtml;
 },
 });
 });
    </script>
  </body>
</html>
This code dynamically generates an HTML table based on the parsed CSV data and inserts it into a designated div container element (csv-table-container). Each row of the CSV data corresponds to a table row (<tr>), and each cell corresponds to a table data cell (<td>). It also applies some basic styling to the table.
Image showing a Parsed CSV File as an HTML Table
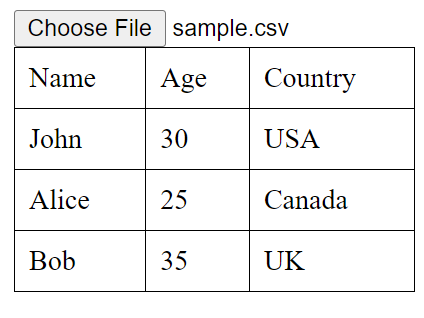
The image above shows the representation of the CSV file as an HTML table. This is a common pattern of displaying CSV files in real-life projects.
Exporting CSV Files
We have completed importing, parsing and displaying CSV files. The next step is to learn how to generate CSV files from JavaScript data structures for export or download. This can be done as a way of saving data or allowing users to download data for offline use.
Generating CSV Files from JavaScript data
Again, PapaParse simplifies this process of generating CSV files from JavaScript arrays or objects. To generate a CSV file from JavaScript data, you can use the unparse method on the Papa object provided by PapaParse. This method converts a JavaScript array of arrays or objects into CSV format, ready for export. The code snippet below shows an example of generating a CSV file from JavaScript data.
const data = [
 ['Name', 'Age', 'Country'],
 ['John', 30, 'USA'],
 ['Alice', 25, 'Canada'],
 ['Bob', 35, 'UK']
];

const csv = Papa.unparse(data);
console.log(csv);
In the code example above, an array containing multiple arrays is converted to a CSV format using the unparse method and logged to the browser console.
Image showing a Generated CSV File
 The image above shows the result of generating a CSV file from a Javascript array of arrays and logging it to the console.
Customizing CSV export options
PapaParse allows you to customize various export options when generating CSV files, giving you flexibility in the output format. Some commonly used options include:
delimiter: specifies the character that separates values in the CSV file. The default uses a comma (,), but you can customize it to any character, such as a tab (\t) or semicolon (;).newline: specifies the character used in the CSV file to indicate the start of the next line. The default character is\r\n, which is compatible with most platforms, but you can customize it as needed.header: Indicates whether the first row of the CSV file should be treated as a header row. If set totrue, the first row will be considered headers, and subsequent rows will be data rows.
For example, we can change the delimiter from the default commas (,) to semicolons (;) with the code snippet below:
const data = [
 ["Name", "Age", "Country"],
 ["John", 30, "USA"],
 ["Alice", 25, "Canada"],
 ["Bob", 35, "UK"],
];

const csv = Papa.unparse(data, {
  delimiter: ";", // Customize delimiter to be semicolons
  header: true, // Treat the first row as the header. This is the default setting.
});

console.log(csv); // Log the generated CSV to console
Image showing Customized CSV
 As shown in the image above, the delimiter for the CSV file has been changed to semicolons (
;).
Summary
In this article, we looked at managing CSV files in JavaScript using PapaParse. From importing files to parsing, displaying, generating, and exporting CSV files, this article aims to give readers a good understanding of what CSV files are and how best to work with CSVs on the web.
References
Understand every bug
Uncover frustrations, understand bugs and fix slowdowns like never before with OpenReplay — the open-source session replay tool for developers. Self-host it in minutes, and have complete control over your customer data. Check our GitHub repo and join the thousands of developers in our community.