Validating Forms with Vue Formulate

Forms are a vital part of an application. Many businesses use forms on their websites to get great benefits. It’s a great way to get responses and prompt people to engage with you. Validating your form is critical because it prevents users from submitting incorrect data and reduces the risk of attackers gaining access to your form application.
When developing an application, we include a form. On the other hand, the management and validation of our form can be complex and repetitive. In this article, we’ll cover one of the Vue.js validation libraries (Vue Formulate), its capabilities, and how it validates our application. Vue.js’s setup and installation will not be covered in this tutorial, so you should already be familiar with those topics.
In this post, we’ll discuss:
- What is Vue Formulate?
- Installing and Setting up Vue Formulate
- Creating our form application
- Why you should use Vue Formulate
- Validating our form with Vue Formulate
- Conclusion
What is Vue Formulate?
Vue Formulate is a Vue.js library used for validating complex forms in your application. Aside from that, it includes a schema to allow you to render complex forms from JSON with groups, wrappers, and custom components.
Installing and Setting up Vue Formulate
The next step is to install our Vue Formulate library before we create our form application. Note there are two ways we can use this library: NPM and CDN, but in this article, we will install the library using NPM.
Install Vue Formulate using the following command:
npm install @braid/vue-formulateAdd the Vue Formulate plugin in our main.js file
import Vue from 'vue'
import VueFormulate from '@braid/vue-formulate'

Vue.use(VueFormulate)
We have successfully installed and set up our Vue Formulate library. The next step is to create our form application.
Creating our form application
In this section, we will build a simple student registration application with a requirement of name, password, email, and course number.
FormulateForm and FormulateInput are two form components that Vue Formulate automatically builds for you. You may compare <FormulateForm> tag to conventional <form> tags in HTML. We will wrap our <FromulateInput> element inside our <FormulateForm> element.
Here is a basic code example.
<FormulateForm>
  <FormulateInput type="number"
  name="Course number"
  label="Course Number" />
  </FormulateForm>
Now that we have seen the basic syntax of the Vue Formulate form component, let’s create our form application.
<template>
  <FormulateForm
    class="form-container"
  >
    <h1 class="form-title">Student Registration Form</h1>
    <FormulateInput name="name" label="Name" />
    <FormulateInput name="email" label="Email" />

    <FormulateInput type="password" name="password" label="Password" />
    <FormulateInput type="number" name="Course number" label="Course Number" />

    <FormulateInput type="submit" label="Register" />
  </FormulateForm>
</template>
<style >
@import url("https://fonts.googleapis.com/css2?family=Work+Sans:wght@300&display=swap");

* {
  box-sizing: border-box;
  font-family: "Work Sans", sans-serif;
}

.border {
  border-color: #3d9421;
}

.form-title {
  font-size: 20px;
  font-weight: bolder;
  line-height: 70px;
}

.form-container {
  display: grid;
  background: white;
  width: 448px;
  margin: auto;
  padding: 50px;
  border-left-width: 4px;
  border: 1px;
  border-radius: 0.75rem;
  --tw-shadow: 0 25px 50px -12px rgba(0, 0, 0, 0.25);
  box-shadow: var(--tw-ring-offset-shadow, 0 0 #0000),
    var(--tw-ring-shadow, 0 0 #0000), var(--tw-shadow);
}
</style>
Here is an illustration of how our form looks like without validation.

In the output above, if we enter the wrong information, our data will be submitted successfully, but that is not what we want. Let’s look at how to validate our form, but first, let’s see some advantages of using Vue Formulate.
Why should you use Vue Formulate?
Vue Formulate is one of the simplest libraries for creating and validating forms in Vue.js. It can handle the complexity of validating a form because it has features like form and field validation, file uploads, form generation, single-element inputs that allow labels, help text, error messages, placeholders, and more, as well as a lot of information you can use in your projects.
You can use various libraries to validate your form, but Vue Formulate is the best when it comes to ease and flexibility because it spares you the stress of designing and creating your form from scratch. Other advantages of utilizing Vue Formulate include:
Simple Form Element
When working on a large application that involves form submission, it can frequently be difficult for developers to recall the names of the many components. With only one easy component, Vue Formulate generates all your form elements.
Custom styling
I am aware that many developers prefer to style their applications differently from the default design. Fortunately, Vue Formulate allows you to use any of your preferred CSS frameworks. That unique style can be added globally.
Easy validation
A full built-in validation API is available with Vue Formulate. It also lets you customize your messages and add extra validation rules to meet the needs of your form application. When the validation criteria are not met, it automatically shows error messages.
After learning about Vue Formulate and the benefits of using it, let’s have a look at a code example of how to incorporate it.
Open Source Session Replay
OpenReplay is an open-source, session replay suite that lets you see what users do on your web app, helping you troubleshoot issues faster. OpenReplay is self-hosted for full control over your data.

Start enjoying your debugging experience - start using OpenReplay for free.
Validating our form with Vue Formulate
One of the unique things about Vue Formulate is that it makes it extremely easy to add validation to your form with built-in functionalities.
Validation is made simple, accessible to beginners, and developer-friendly using Vue Formulate. There is no compelling reason not to utilize Vue Formulate because it significantly lowers the friction associated with front-end validation.
Let’s look at an example:
<template>
  <FormulateForm
    v-model="formDetails"
    @submit="formSubmit"
    class="form-container"
  >
    <h1 class="form-title">Student Registration Form</h1>

<FormulateInput
      name="name"
      type="text"
      label="Name"
      validation="required"
      help= "Your name must begin with capital letter"
    />
     <FormulateInput
      name="email"
      type="email"
      label="Email"
      validation="^required|email"
    />

    <FormulateInput
      type="password"
      name="password"
      label="Password"
      validation="^required|min:6,length"
      help= "Your password must be at least 6 characters long."
      autocomplete="off"
    />
    <FormulateInput
      type="number"
      name="Course number"
      label="Course Number"
      validation="required|max:4"
    />
    <FormulateInput
      name="terms"
      type="checkbox"
      label= "I accept, and have inputted the correct details."
      validation="accepted"
    />

    <FormulateInput type="submit" label="Register" />
    <h2>Form Details Box</h2>
    <p>{{ formDetails }}</p>
  </FormulateForm>
</template>
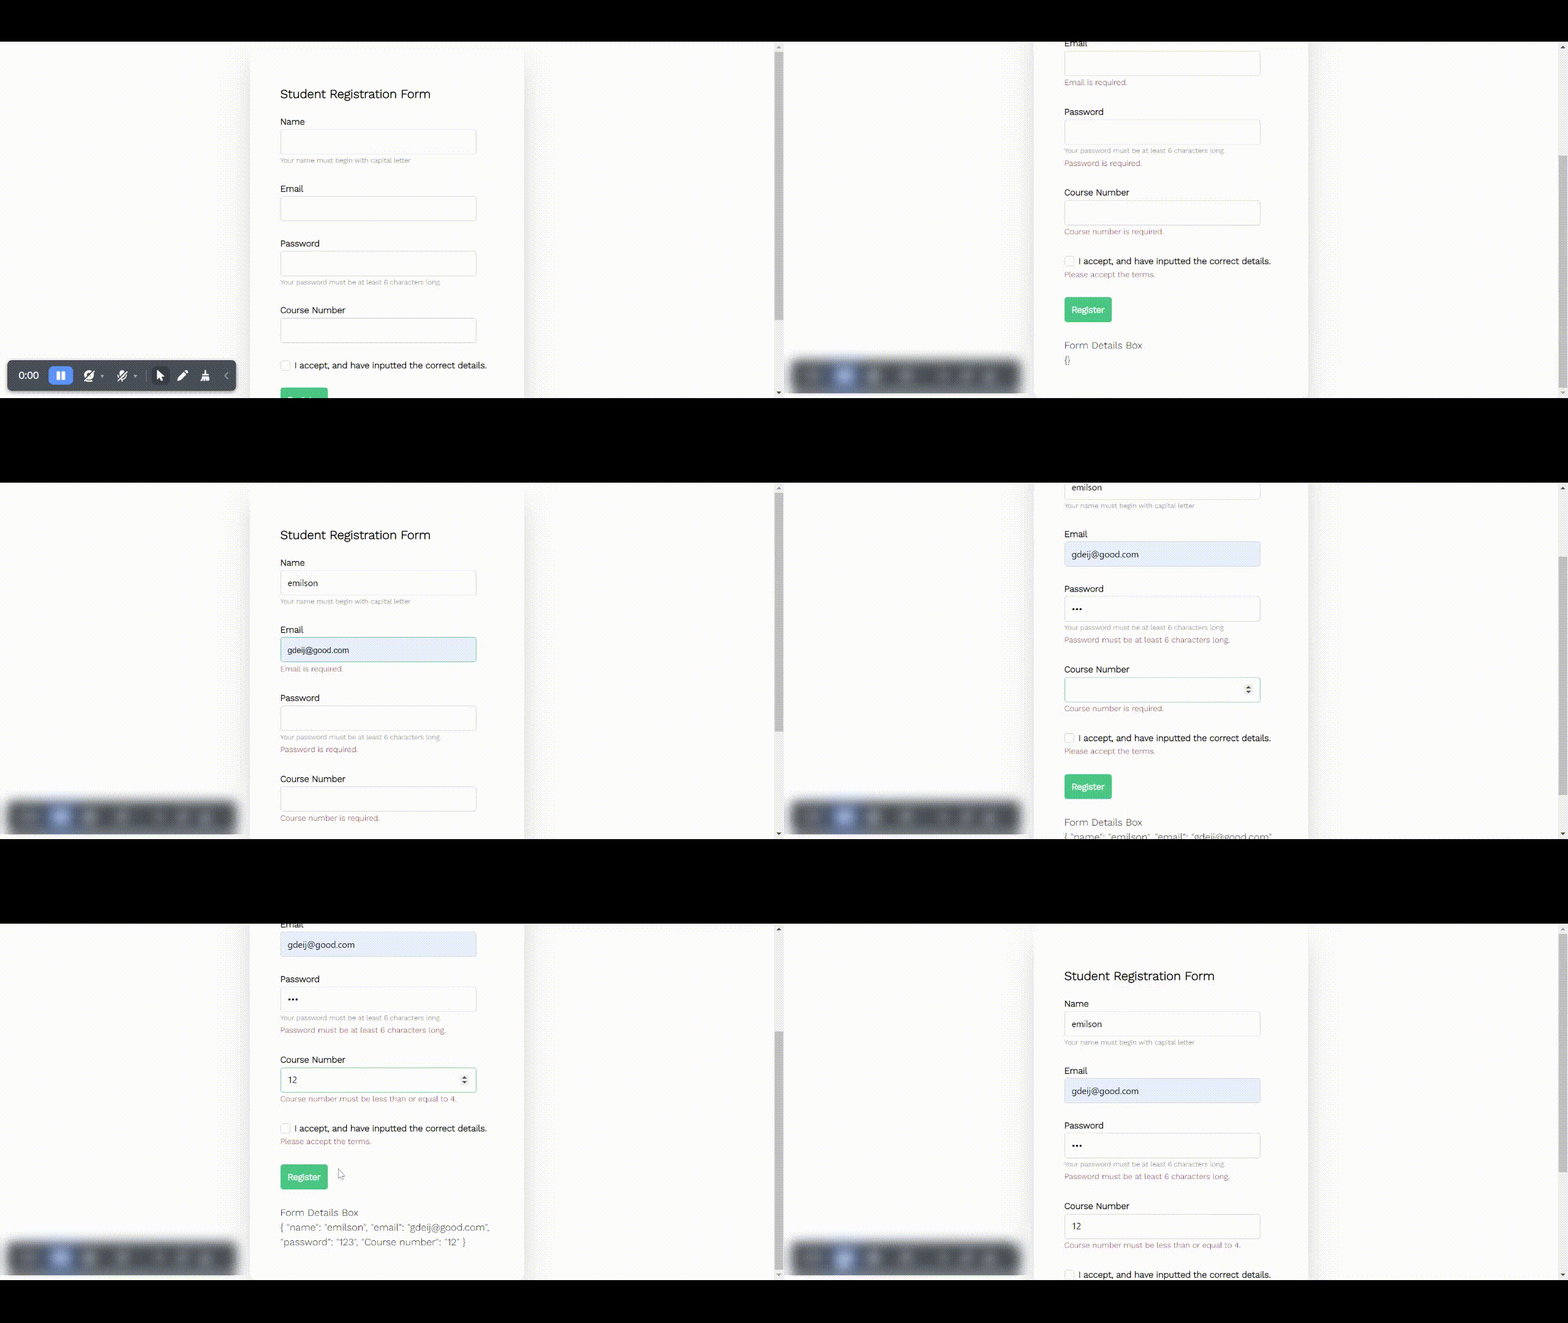
Here is an output of what our application looks like after validating it with Vue Formulate:

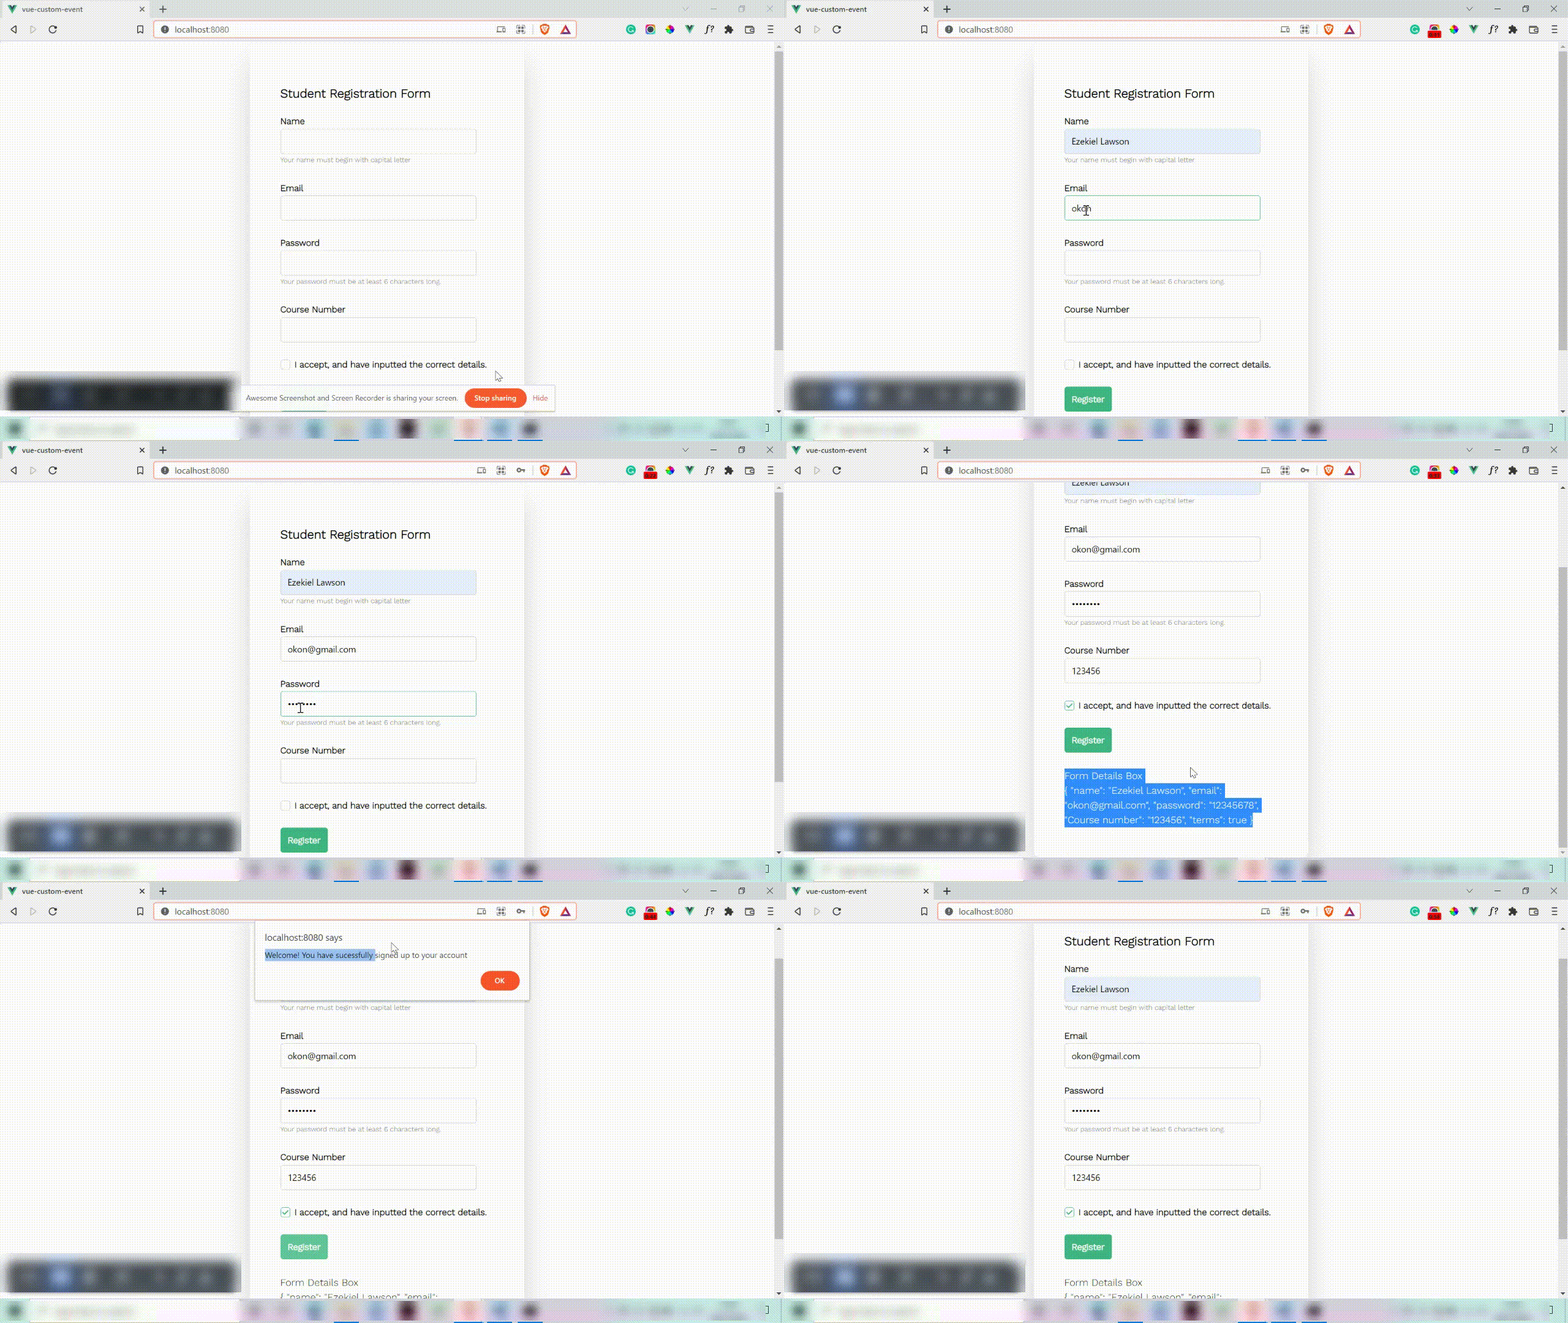
The final output is as follows:

Vue Formulate has several built-in validation methods, and you can easily add as many rules as you want in each FormulateInput element. Such as :
There are more validation rules, but if you can’t find a rule that meets your demands, you can design your own validation rules, which is something special.
Here is a simple example
 <FormulateInput
      type="password"
      name="password"
      label="Password"
      validation="^required|min:10,length|min:6"
      help= "Your password must be at least 6 characters long mixed with characters."
      autocomplete="off"
    />
Note: Use the vertical bar (|) to divide each rule you add to the validation.
Conclusion
Handling and validating forms in a large application can be hard work because each form component must be made from scratch, and validation rules must be made for each form component.
The procedure is significantly easier and more tolerable with Vue Formulate. In addition to building form elements with a single component, other features include customizing form styles, reusing validation rules, messages, and custom input in other projects, and showing error messages with the built-in validation API.
A TIP FROM THE EDITOR: For validation using vanilla JavaScript, don´t miss our Form Validation Using JavaScript’s Constraint Validation API article.
